What We Mean by “Dehydrate”
Here at Easy Food Dehydrating, “dehydrate” always means using an electric food dehydrator — the easy, reliable way to dry food at home.
- Home
- Easy Dehydrated Food Recipes
- Dried Fruit Bars Recipe

Dried Fruit Bars Recipe: Healthy Homemade Energy Bars

Homemade dried fruit bars are the perfect blend of chewy sweetness and nutty crunch—without the added sugars of store-bought snacks. This easy recipe combines dates, apricots, nuts, and honey for a naturally sweet energy bar that’s great for breakfast, workout fuel, or an afternoon pick-me-up.
✅ Quick Answer: How do you make dried fruit bars?
Chop dried dates and apricots, pulse nuts, then mix with honey. Press into a parchment-lined pan, bake at 325°F for 10–20 minutes, cool, and slice. Store in an airtight container, refrigerate, or vacuum seal for lasting freshness.
The best part? You only need a handful of ingredients and less than 30 minutes to whip up a batch that keeps for weeks with proper storage.

My dried fruit bars are a healthy alternative to store-bought sugary snacks. I use natural, wholesome ingredients like dried dates and apricots, along with mixed salted nuts, and honey.
First things first: dehydrate 20 apricots and 20 to 25 dates... or buy the apricots and dates pre-dried at your local grocery store.
Why You'll Love These Dried Fruit Bars
- Naturally sweet – No added sugars, just wholesome fruit.
- Quick & easy – Simple ingredients, minimal prep.
- Customizable – Swap nuts, fruits, or add chocolate!
- Perfect for on-the-go – Ideal for breakfast, snacks, or workouts.
Questions about creative flavor combinations? The key is to experiment and find what works best for your taste buds and needs! See our flavorful colorful combo suggestions shown further down the page.

Dried Fruit Bars (Dates, Apricots, Nuts, & Honey) Recipe
Ingredients:
- 20 - 25 dried dates (half of a 10 oz. canister)
- 20 dehydrated apricots (or store bought)
- 4 oz assorted salted nuts
- honey to combine (between 1-2 fluid oz)
Instructions:
When all your ingredients are mixed together, bake the fruit bars in an oven:

💡 Tip: Outside the U.S.? Most dehydrating temps here are listed in Fahrenheit - use our quick converter to see the Celsius equivalent for your machine.
- Preheat your oven to 325°F.
- Prepare your fruit and nut mixture by chopping the dates and apricots into similar-sized pieces.
- Pulse the assorted nuts in a food processor to break them up a bit (or leave whole).
- Place in a glass bowl, and add honey until they combine well.
- Line an 8" square baking pan with parchment paper and spread the mix evenly on top.
- Place the pan in the preheated oven and bake for 10 to 20 minutes, or until the fruit mixture is dry to the touch, and holds together when pressed.
- The exact time will depend on the thickness of your mixture.
- Once done, remove the pan from the oven, let the dried fruit bars cool down to room temperature.
- Cut into bars and store. And eat.
Keep a close eye on your bars while they bake in the oven to prevent them from burning!
After letting them cool, store the dried fruit bars in an airtight container for a longer shelf life. Your taste buds will thank you for this delicious snack!

NOTE: My bars didn't stiffen up as much as I would like (and that's why it's the number 1 FAQ!) I put the cooled-down pan "as is" in the freezer for an hour. That helped!
I then turned the pan upside down onto a cutting board and cut the bars into strips with a paring knife and then vacuum sealed them individually.

Keep Them Fresh: Best Ways to Store Homemade Fruit Bars
Extend shelf life and prevent spoilage with an airtight vacuum seal. Here’s why:
Prevents mold – No air = no bacteria growth.
Saves money – Buy ingredients in bulk and store safely.
Portable snacks – Pre-sealed bars are perfect for road trips!
After chilling the dried fruit bars in the fridge and after unwrapping them after vacuum-sealing, they come out like this:

To keep your fruit bars at peak tastiness, consider using a FoodSaver food vacuum sealer. Doing so makes it easy to write the date on the package.
Read more about food vacuum sealers here, and vacuum sealer bags here.


Compare Top FoodSaver Models & Starter Kits
The FoodSaver machines remove air, one of the main causes of mold and food spoilage - and they create an airtight seal to lock in freshness.

Bonsenkitchen Vacuum Sealer Machine
The Bonsenkitchen Vacuum Sealer is a powerful, low-noise machine built for high-speed, continuous use. It features a handle-locked design, built-in cutter, and comes with 2 bag rolls plus 100 vacuum bags — everything you need for easy, efficient food preservation.

Keep food fresh up to 5x longer with the FoodSaver 4800 2-in-1 Vacuum Sealer. Automatic sealing, built-in handheld sealer, and easy-clean drip tray make it perfect for everyday meals or bulk storage.

FoodSaver 8" x 20' rolls, 6-pk
FoodSaver GameSaver 8" x 20' Vacuum Seal Long Roll with BPA-Free Multilayer Construction
- Keep game and fish fresh up to 5x Longer with FoodSaver GameSaver 8-inch rolls.
- Create custom-sized bags - simply cut a piece to your desired length, seal one end, fill, and then vacuum seal.
- 8" x 20' rolls
- BPA-free
- Pack of six rolls

FoodSaver 1-Quart Food Storage Sealer bags
- Constructed of durable yet pliable material that creates an airtight barrier around foods, extending freshness and locking in flavors
-
Quickly and easily portion food
from bulk shopping or when storing leftovers.
- BPA-FREE MATERIAL: Safe for storing raw and cooked foods, it's also freezer, refrigerator, microwave, and boil-safe
- 1-quart size precut bags, 44-count

FoodSaver Pint-size Food Storage Sealer bags
- Constructed of durable yet pliable material that creates an airtight barrier around foods, extending freshness and locking in flavors
-
Quickly and easily portion food
from bulk shopping or when storing leftovers.
- BPA-FREE MATERIAL: Safe for storing raw and cooked foods, it's also freezer, refrigerator, microwave, and boil-safe
- 1-pint size precut bags, 28-count
As an Amazon Associate, I earn commission from qualifying purchases. The price you pay does not increase. Read disclosure here.
If you want to save money, try these Weston brand food vacuum sealer bags for a 100-count pack. Note that they are 3 mil thick! These are the ones I use.

2 Ply 3mm Thick, for NutriFresh, FoodSaver & Other Heat-Seal Systems, for Meal Prep and Sous Vide, BPA Free, 6" x 10" (Pint), 100 count, Clear
As an Amazon Associate, I earn commission from qualifying purchases. The price you pay does not increase. Read disclosure here.
A Sweet, Nutritious Treat the Whole Family Will Love

Our dried fruit bars recipe is a delicious treat without the added sugars in commercial fruit and nut bars. They're a perfect choice for nutritionally-minded people because they contain natural sugars and the nuts contain healthy fats.
Here are three popular and delicious fruit combinations often used in a dried fruit bars recipe:
3 Irresistible Fruit & Nut Bar Flavor Combos

Tropical Delight
- Dried mango
- Dried pineapple
- Dried coconut flakes
- Brazil nuts or macadamia nuts
This combination offers a burst of tropical flavors. The sweetness of mango and pineapple is balanced by the nutty, buttery taste of Brazil nuts or macadamia nuts, while the coconut flakes add a nice texture and subtle sweetness.

Berry Bliss
- Dried cranberries
- Dried blueberries
- Dried goji berries
- Almonds or pecans
This berry-filled bar is packed with antioxidants. The tartness of cranberries contrasts nicely with the mild sweetness of blueberries and the slight tanginess of goji berries. Almonds or pecans provide a crunchy texture and nutty flavor that complements the berries.

Orchard Harvest
This fruity combination is reminiscent of a walk through an orchard! The chewy sweetness of dried apples and apricots is balanced by the rich, honeyed taste of dried figs. Walnuts or pistachios add a nice crunch and a slightly bitter note that keeps the bar from being overly sweet.
Mix and match dried fruits and nuts based on your personal preferences and what's available to you in the store. Other popular ingredients include dried cherries, raisins, cashews, pumpkin seeds, and sunflower seeds.
You can add spices like cinnamon, nutmeg, or ginger for extra flavor depth.
Check out my easy NO-BAKE version here.
Boost Texture & Binding: Use Coconut Oil or Almond Butter

Best Coconut Oil - Nature’s Way MCT Oil
- Coconut oil adds firmness and a mild tropical flavor.
- Almond butter (see how to make it, below) enhances chewiness and gives a rich, nutty taste.
- Mix both for ultimate texture control!
As an Amazon Associate, I earn commission from qualifying purchases. The price you pay does not increase. Read disclosure here.
When using coconut oil in your fruit bars, remember that a little goes a long way. You usually only need a tablespoon to get the binding and textural benefits.
Too much coconut oil can make the bars look and taste greasy.
DIY Almond Butter: Easy & Fresh!

Ingredients:
- 2 cups raw almonds (unsalted, unroasted)
Instructions:
- Optional: Roast almonds at 350°F for 10-15 minutes, then cool.
- Blend in a food processor – First, it turns to meal, then a thick paste, then creamy butter (10-20 mins total).
- Scrape sides down as needed.
- For extra smoothness, add a drizzle of coconut or avocado oil.
- Store in a jar & refrigerate – Lasts for weeks!
💡 Bonus: Add honey or vanilla for a natural flavor twist!
Check out: Love and Lemons Almond Butter Recipe for more tips!
Making your own almond butter allows you to control the ingredients and texture, plus it can be more economical than buying it from the store. It's a fun and satisfying (but somewhat noisy) kitchen project!
Frequently Asked Questions
The dried fruit bars recipe top question below is not surprising, I had the same question myself when I made my first batch:
How do you get fruit bars to stick together better?
How do you get fruit bars to stick together better?
Use sticky dried fruits like dates or figs, plus a binder such as nut butter, honey, or coconut oil. Press the mixture firmly into the pan and chill before slicing for best results.
- Sticky dried fruits – Dates, figs, or raisins work best.
- Nut butters – Almond or peanut butter acts as a natural glue.
- Liquid sweeteners – Honey or agave syrup enhances binding.
- Coconut oil – Solidifies when chilled, keeping bars firm.
- Press firmly – Tightly pack the mixture into your baking dish.
- Chill before cutting – A quick freezer session improves texture!
What’s the best way to store dried fruit bars?
What’s the best way to store dried fruit bars?
Keep them in an airtight container in the fridge for up to 2 weeks, vacuum seal for months, or freeze for up to 3 months. Always thaw in the fridge before eating.
Can I make dried fruit bars without nuts?
Can I make dried fruit bars without nuts?
Yes! Replace nuts with seeds (pumpkin, sunflower, or chia), oats, or puffed rice. Seed butters like sunflower butter or tahini work as binders too.
Do I need to bake dried fruit bars?
Do I need to bake dried fruit bars?
Not always—many no-bake recipes set in the fridge. This baked version ensures firmer bars, while the no-bake option gives a chewier, softer texture.
Can I add chocolate or spices for flavor?
Can I add chocolate or spices for flavor?
Absolutely. Cinnamon, nutmeg, or ginger add warmth, while chocolate chips or cocoa powder turn them into a sweet treat.
These chewy, sweet, and crunchy dried fruit bars are proof that simple ingredients can make the best snacks. Whether you pack them for breakfast, workouts, or road trips, they’ll quickly become a family favorite.
And before you go, be sure to grab your free 5 Dried Food Recipes You'll Actually Love PDF below—featuring carrot soup, minestrone soup, split pea soup, spicy beef jerky, and banana cinnamon rolls!
Get 5 Dried Food Recipes You'll Actually Love

Here's where you can get your copy of our all new
5 Dried Food Recipes (That Actually Taste Great)
They're my all-time favorite easy dried food meals!
Get it here right now.
For Free!
You Might Like These
Potato and Bacon Hash: A Savory One-Pan Meal
Make potato and bacon hash in one pan—crispy, savory, and filling. The perfect comfort food any time of day.
Easy Dehydrated Food Recipes: Tasty Meals Made Simple
Easy Dehydrated Food Recipes: It's easy to make dishes from dehydrated fruits and veggies!
How to Make Vegetable Soup with Dehydrated Vegetables!
Vegetable soup with dehydrated vegetables—easy to make, nutrient-packed, and full of rich, satisfying flavor!
Curried Celery & Potato Soup with Orzo - Easy Recipe
Spice up your soup game with Curried Celery and Potato Soup featuring Orzo. A warming, flavorful bowl of comfort!
Cozy Chicken Noodle Soup with Dehydrated Veggies
Make cozy chicken noodle soup fast using dehydrated carrots, onions, celery, and chicken. Rehydrate, simmer, and serve.
Homemade Pizza: Non-Stick Crust Tips & Topping Wins
Make homemade pizza that won’t stick: use parchment, pre-bake 3–5 minutes, then top and bake at 450°F for a crisp crust.
Before You Go...
If you enjoyed this page, tap the ❤️ in the lower right-hand corner.
It saves this page to your Grow bookmarks so you can find it again later.
You’ll also see quick share buttons to copy the link, post to Facebook,
or save it straight to Pinterest.
What We Mean by “Dehydrate”
Here at Easy Food Dehydrating, “dehydrate” always means using an electric food dehydrator — the easy, reliable way to dry food at home.
Click the "Save" button (above) to pin
this page’s ideas to your Pinterest board!


LATEST READS on EFD
-
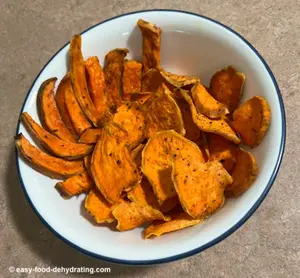
Dehydrated Sweet Potato Treats: Human and Dog Approved
May 12, 26 09:01 AM
 Make these dehydrated sweet potato treats for you AND your dog. Plus dog-safe tips for sharing the love of snacking!
 -
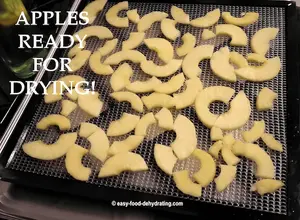
Dehydrate Apples for Snacks and Pantry Storage
May 11, 26 09:07 AM
 Dehydrate apples easily: slice, prevent browning, dry at 125–135°F, and store for snacks, pies, or pantry use.
 -
Green Split Pea Soup Made Easy in the Slow Cooker
Apr 30, 26 09:10 AM
 Easy slow cooker green split pea soup with ham, carrots, and celery—comforting, flavorful, and simple to make.

Unlock the Secrets of Food Dehydrating... from Fruit 'n' Veg to Doggie Dinners!


AFFILIATE DISCLOSURE: I am an Affiliate for Amazon, and other sellers of quality merchandise. Should you purchase an item through their links, I may receive compensation. The price you pay does not increase. THANKS for your support! Read full disclosure here.
easy FOOD DEHYDRATING: Making food preservation simple since 2010. I show you how to keep your food pantry full, whatever the reason or season!

HOME ARTICLES CONTACT DMCA DISCLAIMER FAQ PRIVACY SITEMAP TERMS TESTIMONIALS
ALL CONTENT COPYRIGHT © 2010-2025 • ALL RIGHTS RESERVED REGARDLESS OF LINKS OR ATTRIBUTIONS.
POWERED BY SBI! (SOLO BUILD IT!)
As an Amazon Associate, I earn from qualifying purchases.