What We Mean by “Dehydrate”
Here at Easy Food Dehydrating, “dehydrate” always means using an electric food dehydrator — the easy, reliable way to dry food at home.
- Home
- Articles On How To Dehydrate Food Safely
- Fruit dehydration Basics and Equipment - Pt 1

Fruit Dehydration
Basics and Equipment - Part One

Fruit Dehydration Basics and Equipment - Part One
Dehydrating fruit has been around for centuries - and it’s still one of the simplest, smartest ways to preserve nature’s goodness today.
✅ Quick Answer: What are the basics and equipment needed for fruit dehydration?
Fruit dehydration removes water from fresh produce to prevent spoilage while concentrating sweetness and nutrients. All you need is sliced fruit, consistent low heat (usually 135–140°F), and proper storage containers. A food dehydrator makes the job easier, but an oven or air fryer can also work.
At its core, fruit dehydration turns fresh produce into long-lasting, naturally sweet snacks you don’t need to refrigerate or freeze. It’s budget-friendly, waste-reducing, and lets you enjoy your favorite fruits all year round.

You might be wondering: “Why dehydrate fruit at all?”
Simple - it’s versatile, stretches your grocery budget, and locks in that natural sweetness you just can’t find in the store-bought stuff.
Maybe you’re a parent who needs healthy lunchbox fillers, a hiker who doesn’t want snacks weighing you down, or maybe you’re just tired of giving your compost bin the best fruit in the house. Whatever the reason, dehydrating at home is a fun and surprisingly easy way to keep fruit around long after it should’ve gone soft.
About This Fruit Dehydration Basics and Equipment Page
Think of this guide as your roadmap: we’ll cover the basics, the must-have gear, and those small tips that save you from wasted fruit (and wasted patience). No second-guessing, no sad trays of mystery fruit.
📝 Quick heads-up:
This is Part 1, where we’ll dig into the science of fruit drying, the big benefits, the best starter equipment, and a few prep must-dos.
👉 Part Two is where the fun really happens - you’ll learn step-by-step how to actually dehydrate your fruit, store it the right way, use it in tasty recipes, and even fix things if a batch decides to misbehave.
Stick with me, and you’ll be the person with jars of sunshine lining the pantry shelves - while everyone else is still tossing mushy bananas.
Why Dehydrate Fruit - Benefits You’ll Love
Dehydrating fruit isn’t rocket science - but it is pretty fascinating once you stop and think about it.
By pulling out the water, you’re basically doing two clever things at once:
- Making it tough for mold and bacteria to crash the party
- Concentrating all that natural sweetness and goodness into a smaller, tastier package
Yes, a little Vitamin C may go during the process, but the good news is you’re still holding on to the bulk of the fiber, minerals, and flavor. In other words - most of the “good stuff” sticks around.
So whether you’re stretching your harvest, saving fruit from the compost bin, or just stocking up on grab-and-go snacks, dehydrating fruit is one of the easiest ways to keep a little taste of sunshine on your shelf all year long.
The Science of Drying Fruit (and Why It Tastes Better)
Ever slice into an apple or pear and watch it start turning brown? That’s enzymes teaming up with oxygen, basically a mini chemistry lab happening right there on your cutting board.
The good news? You can hit the pause button on that browning with a quick dip in lemon juice or a Vitamin C solution. Easy fix.
Now, during dehydration, here’s where the real magic happens:
As the water leaves the fruit, the natural sugars get squeezed into a smaller space.
Result? The flavor gets dialed way up! Think of it as nature turning down the water volume and turning up the sweet goodness.
Even better - you’re holding on to most of the minerals, fiber, and flavor. Yes, a little Vitamin C might slip out the back door, but what you’re left with is a nutrient-dense bite that packs more punch than the fresh version.
So really, it’s a lot like making a smoothie with less liquid - everything good stays, but in a smaller, more powerful punch.
Why Fruit Turns Brown
- Natural oxidation processes
- Color changes in fruits
- Methods to control browning
How Sugar Intensifies During Drying
- Natural sweetness enhancement
- Crystal formation
- Texture development
What Nutrients Stay (and What Fades) When Drying
- Heat-sensitive vitamin retention
- Mineral concentration
- Fiber density increases
And maybe best of all - there’s something downright satisfying about pulling out your homemade dried strawberries in the middle of winter.
Practical Benefits of Drying Fruit
- Extended shelf life (6 months to 1 year)
- Reduced storage space (up to 80% reduction)
- Lightweight for transportation and backpacking
- No refrigeration required
- Cost-effective preservation method
Nutritional Benefits of Fruit Drying
- Concentrated nutrients per serving
- Preserved fiber content
- Maintained mineral content
- Natural sugar preservation
- No added preservatives needed
Time & Temperature Tips for Perfectly Dried Fruit

Getting the timing and temperature right is crucial for successful fruit dehydration. Here's a straightforward guide to help you navigate the process:
Dehydrating Fruit Times
- Thin sliced fruits: 6-12 hours
- Medium sliced fruits: 12-18 hours
- Thick sliced or whole fruits: 18-24 hours
- High moisture fruits: Up to 24 hours
*Note: Drying times can vary based on factors like fruit ripeness, slice thickness, humidity, and your specific dehydrator model. Always check for dryness by ensuring the fruit is leathery and no moisture is visible when cut.
Dehydrating Fruit Temperature
💡 Tip: Outside the U.S.? Most dehydrating temps here are listed in Fahrenheit - use our quick converter to see the Celsius equivalent for your machine.
The optimal dehydrating fruit temperature varies by type:
- Berries and grapes: 135°F
- Stone fruits: 135-140°F
- Apples and pears: 140°F
- Citrus fruits: 135°F
*Tip: For fruits like lemons and limes that may brown at higher temperatures, consider dehydrating at a lower temperature of 115°F (46°C) to preserve color and flavor.
Alternative Methods: Using an Air Fryer
Yes, you can dehydrate fruit using an air fryer! Here's how:
- Thin slices: 2-4 hours at 135°F
- Medium slices: 4-6 hours at 135°F
*Note: Air fryers can dry faster than traditional dehydrators, so it's essential to check the fruit periodically to prevent over-drying.
Smart Storage Tricks to Keep Dried Fruit Fresh
You’ve put all that time into dehydrating - now let’s make sure it stays fresh, safe, and snack-ready!
Best Everyday Storage Tricks
People often ask, "Can you freeze dehydrated fruit?"
✅ Yes, you absolutely can!
Freezing dried fruit (once it’s fully dry and properly packed) can stretch the shelf life from about a year up to several years.
For everyday storage, stick to these basics:
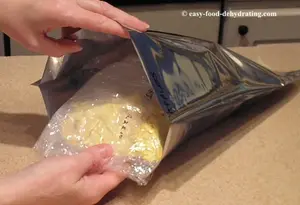
- Use airtight containers, glass Mason jars, or vacuum-sealed bags
- Keep dried fruit in a cool, dark, dry place
- Label your containers with the date so you can keep track
💡 Pro Tip: If you live somewhere humid, add oxygen absorbers and desiccant packets to your vacuum-sealer bags and/or Mason jars!
How to Tell if Your Dried Fruit is Truly Finished Drying
Before you stash it away, make sure it’s truly dry. Here’s what to look for:
✔ Fruit should be leathery but still a little flexible (not brittle)
✔ No visible moisture if you cut it open
✔ Berries should make a light rattling sound when you shake the container
✔ Pieces should feel dry to the touch, but not crumbly
If it feels sticky or moist at all? It needs a little more time in the dehydrator!
Top Mistakes That Cause Mold (and How to Prevent Them)
Nobody wants to open a jar of beautiful dried fruit and find mold. 😬
Here’s what usually goes wrong - and how to stop it:
❌ The fruit wasn’t completely dried before storing
❌ Containers weren’t truly airtight
❌ Moisture sneaked back in somehow
❌ The storage area was too humid
The fix?
Dry it fully, cool it completely, seal it tight — and pick a cool, dry storage spot.
Is Dehydrated Fruit Healthy? Tips You Should Know
Is Dehydrated Fruit Still Healthy?
Short answer: YES!
While some delicate vitamins (like Vitamin C) can fade a bit during drying, most minerals, fiber, and natural goodness actually get concentrated.
Dehydrated fruit gives you a powerhouse snack with a lot more staying power than fresh fruit.
Special Notes for Diabetics
Dehydrated fruits are still healthy, but they do have concentrated natural sugars.
If you’re managing diabetes, portion size is key — and it’s always smart to check with your doctor or nutritionist about how much fits into your plan.
Can Dogs Eat Dried Fruit Safely?
Some dried fruits are fine for dogs — but not all!
Safe options include:
- Apples (no seeds, please)
- Bananas
- Strawberries
🚫 But never feed dogs grapes or raisins - even in dried form, they can be toxic.
A small dried fruit treat once in a while can be a fun snack, but moderation is important (and always double-check what’s safe if you’re unsure).
Handy Dehydrating Fruit Chart (Bookmark This!)

Must-Have Equipment for Easy Fruit Dehydration
Choosing the right dehydrator makes all the difference when it comes to easy, successful fruit drying.
Here’s a quick breakdown of your main options:
Budget-Friendly Vertical Dehydrators
These are the budget-friendly models that get the job done — especially if you’re just starting out. Think Nesco and Elite Gourmet brand dehydrators with the air circulating fan at the top.
Just know you’ll probably need to rotate trays once or twice during the drying process to get even results.
Mid-Range Horizontal Dehydrators
Think of these as the Excalibur type dehydrators with the air-circulating fan at the rear.
They’re a little pricier, but you get better air circulation, more even drying without babysitting, and finer temperature control.
Heavy-Duty Commercial Dehydrators
These big guys are for serious food preservers and small businesses.
They offer huge capacity, precise temperature control, and multiple fans — but they’re definitely a bigger investment.
If you’re just getting started, you don’t need one... yet! 😉
Vertical Airflow Dehydrators
- Budget-friendly options
- Suitable for beginners
- May require rotation of trays
Horizontal Airflow Dehydrators
- More even drying
- Better temperature control
- Professional-grade options
Commercial Grade Dehydrators
- Large capacity
- Precise temperature control
- Multiple fan systems
Still deciding which dehydrator fits your needs (and your budget)? Check out my Food Dehydrator Cost Guide for side-by-side comparisons and smart buying tips.
No Dehydrator? Try These Drying Alternatives
No dehydrator? No problem! You’ve still got options for drying fruit at home — you’ll just need a little extra patience and attention.
Oven Drying
- No extra equipment needed (you already own it!)
- Less energy-efficient than a dehydrator
- Requires careful temp monitoring (ovens tend to swing hotter)
- Best for small batches — not great for big preserving jobs
Solar Drying
- Free energy — thanks, sunshine!
- Very weather dependent (needs dry, hot, breezy days)
- Requires screens to keep bugs and dust off
- Takes longer than using a dehydrator — but it works beautifully in the right climate
Basic Tools and Supplies for Easy Dehydrating
Progressive International Mandoline Slicer from Amazon

Make it a little easier by using a knife or a mandoline, but please be careful.
Make sure that you keep the cuts a uniform thickness, for even drying times.
Thinner ones make great chips, and thicker ones are OK for mashing up (after rehydrating) for use in zucchini loaves.
As an Amazon Associate, I earn commission from qualifying purchases. The price you pay does not increase. Read disclosure here.
Before you dive in, having the right tools on hand will make life a whole lot easier — and your results a whole lot better.
At minimum, you’ll want:
- A sharp knife and a sturdy cutting board (for even slices — uneven = uneven drying!)
- A mandoline slicer — see my full review here — speeds up slicing and makes prepping big batches a breeze.
- Lemon juice or citric acid for pretreating fruit to prevent browning
- Airtight containers for storing your finished dried fruit
- Labels and markers so you know what’s what (and when you dried it)
- Basic cleaning supplies — clean tools and a clean workspace = safe, tasty results
💬 And yes, I know "game-changer" nowadays is overused... but a mandoline really is one when you're slicing 5 pounds of apples!
Optional Equipment (If You Want to Get Fancy)
- Vacuum sealer
- Moisture meter
- pH strips
- Temperature probe
- Timer
- Kitchen scale
Fruit Dehydration FAQs You’ll Want Answered
How do you know when dehydrated fruit is really done?
How do you know when dehydrated fruit is really done?
It should feel leathery but bend without breaking. Cut a piece open — there should be no visible moisture inside.
Can you dehydrate fruit without a dehydrator?
Can you dehydrate fruit without a dehydrator?
Yes! An oven on its lowest setting or even an air fryer can work. Just watch closely to avoid over-drying.
What’s the biggest rookie mistake when dehydrating fruit?
What’s the biggest rookie mistake when dehydrating fruit?
Uneven slicing. If pieces aren’t the same thickness, some will dry too fast while others stay sticky.
How long does dehydrated fruit last?
How long does dehydrated fruit last?
Stored airtight, it lasts 6–12 months. Add oxygen absorbers along with desiccant packets (or freeze it) - and you can extend that to several years.
Is it cheaper to dehydrate fruit at home?
Is it cheaper to dehydrate fruit at home?
Definitely. Buying fruit in season (or on sale) and drying it yourself is usually far cheaper than store-bought dried fruit.
Which equipment do I really need to get started?
Which equipment do I really need to get started?
At minimum: a sharp knife, cutting board, lemon juice for pretreating, and airtight containers. A dehydrator makes life easier but isn’t required.
Ready for the Next Step?
Now that you know the basics of dehydrating fruit at home - from the science to the tools - you're ready to roll up your sleeves and dive into the fun part: getting your fruit prepped and ready for drying!
🍎🍓🍍
👉 Head over to PART TWO: Selecting, Preparing your fruit and Storage Solutions.
Let’s keep that momentum going - your pantry full of homemade dried fruit is just around the corner!
Grab 5 Dried Food Recipes You'll Actually Love

Here's where you can get your copy of our all new
5 Dried Food Recipes (That Actually Taste Great)
They're my all-time favorite easy dried food meals!
Get it here right now.
For Free!
You Might Like These
Mylar Bags for Dehydrated Food Storage: Seal for Years!
Use Mylar bags for dehydrated food storage: oxygen absorbers, sealing tips, and sizes for long-term freshness.
What Are Food Dehydrators? How They Work & Benefits
Learn what food dehydrators are, how they work, and preserve food naturally—no refrigeration or additives needed.
Food Vacuum Sealers – FoodSaver Models & Sealing Tips
FoodSaver food vacuum sealers, how they preserve food longer, and expert tips for safe, airtight storage.
Plastic Wrap Guide: Stop Vacuum-Bag Punctures
Prevent vacuum-bag punctures: cushion sharp edges on vacuum-sealed packets. Easy steps, quick tools, reuse tips.
How to Store Dehydrated Food for Long-Term Freshness
Keep dehydrated food fresh for years: Vacuum sealing, Mylar bags, oxygen absorbers, desiccant packets plus storage tips.
Why Oxygen Absorbers for Dehydrated Food are a Must
Keep dehydrated foods fresh longer with oxygen absorbers. Get sizes, tips, and FAQs for safe long-term pantry storage.
Keep Your Food Pantry Full: Why & Exactly How to Do It
Keep your pantry full with simple strategies. Get the free Six Simple Steps email mini-course to dehydrate safely.
Storing Salt & Sugar: Keep Them Dry, Fresh for Years
Best methods for storing salt and sugar to keep them dry, fresh, and safe for years.
Food Dehydrating for Fun and Profit: New Revenue Stream?
Turn food dehydrating into a money-making side hustle! Sell dried snacks with low startup costs and high demand.
Before You Go...
If you enjoyed this page, tap the ❤️ in the lower right-hand corner.
It saves this page to your Grow bookmarks so you can find it again later.
You’ll also see quick share buttons to copy the link, post to Facebook,
or save it straight to Pinterest.
What We Mean by “Dehydrate”
Here at Easy Food Dehydrating, “dehydrate” always means using an electric food dehydrator — the easy, reliable way to dry food at home.
Click the "Save" button (above) to pin
this page’s ideas to your Pinterest board!


LATEST READS on EFD
-
Dehydrated Sweet Potato Treats: Human and Dog Approved
May 12, 26 09:01 AM
 Make these dehydrated sweet potato treats for you AND your dog. Plus dog-safe tips for sharing the love of snacking!
 -
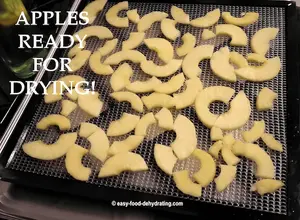
Dehydrate Apples for Snacks and Pantry Storage
May 11, 26 09:07 AM
 Dehydrate apples easily: slice, prevent browning, dry at 125–135°F, and store for snacks, pies, or pantry use.
 -
Green Split Pea Soup Made Easy in the Slow Cooker
Apr 30, 26 09:10 AM
 Easy slow cooker green split pea soup with ham, carrots, and celery—comforting, flavorful, and simple to make.


Unlock the Secrets of Food Dehydrating... from Fruit 'n' Veg to Doggie Dinners!


AFFILIATE DISCLOSURE: I am an Affiliate for Amazon, and other sellers of quality merchandise. Should you purchase an item through their links, I may receive compensation. The price you pay does not increase. THANKS for your support! Read full disclosure here.
easy FOOD DEHYDRATING: Making food preservation simple since 2010. I show you how to keep your food pantry full, whatever the reason or season!

HOME ARTICLES CONTACT DMCA DISCLAIMER FAQ PRIVACY SITEMAP TERMS TESTIMONIALS
ALL CONTENT COPYRIGHT © 2010-2025 • ALL RIGHTS RESERVED REGARDLESS OF LINKS OR ATTRIBUTIONS.
POWERED BY SBI! (SOLO BUILD IT!)
As an Amazon Associate, I earn from qualifying purchases.