What We Mean by “Dehydrate”
Here at Easy Food Dehydrating, “dehydrate” always means using an electric food dehydrator — the easy, reliable way to dry food at home.
- Home
- How to Store Dehydrated Food for Long-Term Freshness
- Storing Salt and Sugar

Storing Salt and Sugar:
The Right Way for Long-Term Freshness

How to Store Salt & Sugar for Long-Term Freshness
Salt and sugar don’t spoil like fresh food, but they’re far from immune to moisture, pests, and clumping.
✅ Quick Answer: What’s the best way to store salt and sugar long term?
Vacuum-seal salt and sugar in food-grade bags with oxygen absorbers and desiccant packets. Wrap them to prevent punctures, place them in Mylar bags, and store in airtight bins or buckets to keep them dry, fresh, and pest-free for years.
If you want to keep these pantry staples fresh and ready for long-term storage, you need more than just a shelf and a plastic bin.
 bins")
From vacuum sealing to Mylar bags and desiccant packets, this guide covers everything you need to know about storing salt and sugar the right way—for everyday use, emergency prep, or years-long shelf life.
I've vacuum-packed yeast that I bought in a larger quantity and re-packaged it into smaller pouches. Now I can bake my own bread whenever I want!
Why Storing Salt and Sugar the Right Way Actually Matters
If you've been a fan of my site for any length of time, I hope you know I want to make sure that families all across the USA—and the world—have enough food put away in case the poop hits the fan (again - Covid-19).
Before I get going with the salt and sugar storage, I want you know that I have a ONE-HOUR course on Udemy that goes into all aspects of storing food for the long term. Read much more about that course HERE.
But let's go over storing salt and sugar as that's why you're here.
Emergency Prep or Everyday Use — Why It Matters
Although Easy Food Dehydrating goes into detail regarding putting away fresh fruits and vegetables, along with cooked meats, I also have canned goods stored away.
Many people have written in asking if they can dehydrate canned goods and my usual response is "Yes, but why go to all that trouble?" because canned goods already last for years "as is."
The stored canned goods I have are canned ham, corned beef, and tuna. Also, canned soups. I take advantage of the buy-one-get-one-free (BOGO) deals at the local grocery store.
But back to dry goods ...
Must-Have Supplies for Storing Salt and Sugar Like a Pro
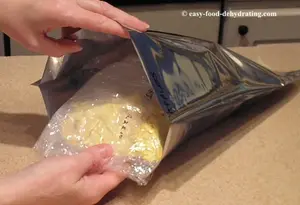
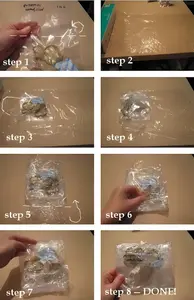
I have been busy storing salt and sugar - and flour - because it's fast and easy. All you do is open up the individual bags, divvy up the contents into vacuum-sealer bags, add a 100cc oxygen absorber and a desiccant packet, then vacuum and seal the bag, and write the date on it and its contents.
What Size Oxygen Absorber + Desiccant Packet Should You Use?
It's very important to add a 300cc oxygen absorber and a 20-50g desiccant packet when storing salt and sugar, as they absorb oxygen and soak up moisture respectively, rather than the salt absorbing and soaking it up!
Wrap the vacuum-sealed packets with cling wrap to protect their sharp corners from piercing other bags, and put the three or four packages inside Mylar bags. (See below for additional info. on Mylar bags).
Are Gamma2 Lids Worth It for Long-Term Food Storage?

Gamma2 Seals Lids - Leakproof Black Lids
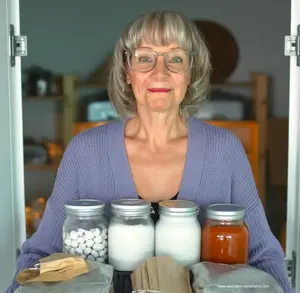
I also store my filled Mylar bags in buckets (or plastic-lidded bins).
I have heard positive reviews for Gamma2 lids and they are specifically for #2 Food-Grade buckets.
As an Amazon Associate, I earn commission from qualifying purchases. The price you pay does not increase. Read disclosure here.
One reviewer gave a rave review—but I think she was storing her flour "loose." The same reviewer said to wash the buckets and the Gamma2 lids prior to use, which makes sense.
I've no argument with that—but seeing as we're using them to store our Mylar bags, there's no need to go to great lengths in pre-cleaning either the buckets or lids (or plastic lidded bins).
The reviewer also stated that these lids were indeed air- and water-tight and that they kept her goodies "bug-free."
These buckets are ideal for storing salt and sugar... and bulk dry pet food!

Top Containers for Storing Salt, Sugar, and More
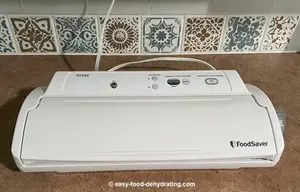
- To store sugar and salt, (or any dried goods such as rice or flour) you need a food vacuum-sealer and the one I recommend is the FoodSaver™ vacuum sealer machine.
- You need food vacuum sealer bags and I highly recommend purchasing them from Amazon. Check my page regarding food vacuum sealer bags here.
- The next items needed are 100cc oxygen absorbers. I get mine from Amazon. NOTE: Buy Mylar bags with oxygen absorbers as a set if you like—it saves on shipping. Read the reviews to make sure you're buying from a reputable seller on Amazon.
- Don't forget the desiccant packets. Read more about those here.
- Mylar bags are my choice for storing pouches of food—about 3 or 4 of the plastic-wrapped packages can fit in a Mylar bag. But DO NOT over-stuff the Mylar bags as you need to have enough room left at the top of the Mylar bag to seal it! Just seal it, no vacuuming. Read why below:
Why You Shouldn’t Vacuum-Seal Your Mylar Bags (And What to Do Instead)
As a REMINDER: Don't try to vacuum the air out of the Mylar bags—it's pretty much an impossible task—because both sides of the bag are smooth. The air can't be removed when the bag is clamped.
On the other hand, the vacuum-sealer bags have little bumps on one inner side so the air CAN be removed!
All we do is SEAL the Mylar bag. If you know you're NOT going to be opening the Mylar bags for at least three- to six months, add a 300cc oxygen absorber and a 20-50g desiccant packet in the Mylar bag before sealing it with the vacuum-sealer "seal" function only.
My storage-preference for Mylar bags are plastic-lidded bins and buckets. See the photo at the top of this page with the bread flour in the plastic-lidded bin.
In the previous section's photo, I have bread yeast stored in the bucket on the closet shelving in air-tight buckets.
I M P O R T A N T :
Smart Extra Tips to Keep Salt and Sugar in Perfect Shape
Don't over-pack your food vacuum sealer bags as this will only lead to punctures.
How to Prevent Punctures with Simple Wrap Tricks
To aid in the anti-puncturing department, I wrap my vacuum-packed bags with plastic wrap.
This softens the sharp edges of the bags so I can fit 3 or 4 of these bundles into my Mylar bags.
Still Have Questions About Storing Salt and Sugar?
Does salt ever go bad in storage?
Does salt ever go bad in storage?
Salt doesn’t spoil, but it can absorb moisture and clump. Proper sealing and the use of desiccant packets prevent this.
Can I store sugar in Mylar bags?
Can I store sugar in Mylar bags?
Yes, sugar stores well in Mylar bags when placed inside vacuum-sealed pouches with desiccants. Just don’t vacuum-seal the Mylar bag—seal it flat instead.
What’s the difference between oxygen absorbers and desiccants?
What’s the difference between oxygen absorbers and desiccants?
Oxygen absorbers remove air (specifically oxygen), while desiccants absorb moisture. You’ll need both to protect salt and sugar from clumping or spoilage.
Can I skip the vacuum sealer?
Can I skip the vacuum sealer?
It’s not recommended. A vacuum sealer helps reduce oxygen and protect against moisture. If you skip it, at least store in tightly sealed containers with both oxygen absorbers and desiccants.
Whether you’re prepping for an emergency or just want peace of mind that your staples won’t spoil, learning how to store salt and sugar properly is time well spent.
From sealing and wrapping to choosing the right bins, these easy steps will save you stress and waste down the line.
And before you go, don’t forget to download your free 5 Dried Food Recipes You'll Actually Love PDF (below)—featuring delicious pantry-friendly meals like carrot soup, minestrone soup, split pea soup, spicy beef jerky, and banana cinnamon rolls!
Get 5 Dried Food Recipes You'll Actually Love

Here's where you can get your copy of our all new
5 Dried Food Recipes (That Actually Taste Great)
They're my all-time favorite easy dried food meals!
Get it here right now.
For Free!
You Might Like These
Mylar Bags for Dehydrated Food Storage: Seal for Years!
Use Mylar bags for dehydrated food storage: oxygen absorbers, sealing tips, and sizes for long-term freshness.
What Are Food Dehydrators? How They Work & Benefits
Learn what food dehydrators are, how they work, and preserve food naturally—no refrigeration or additives needed.
Food Vacuum Sealers – FoodSaver Models & Sealing Tips
FoodSaver food vacuum sealers, how they preserve food longer, and expert tips for safe, airtight storage.
Plastic Wrap Guide: Stop Vacuum-Bag Punctures
Prevent vacuum-bag punctures: cushion sharp edges on vacuum-sealed packets. Easy steps, quick tools, reuse tips.
How to Store Dehydrated Food for Long-Term Freshness
Keep dehydrated food fresh for years: Vacuum sealing, Mylar bags, oxygen absorbers, desiccant packets plus storage tips.
Why Oxygen Absorbers for Dehydrated Food are a Must
Keep dehydrated foods fresh longer with oxygen absorbers. Get sizes, tips, and FAQs for safe long-term pantry storage.
Before You Go...
If you enjoyed this page, tap the ❤️ in the lower right-hand corner.
It saves this page to your Grow bookmarks so you can find it again later.
You’ll also see quick share buttons to copy the link, post to Facebook,
or save it straight to Pinterest.
What We Mean by “Dehydrate”
Here at Easy Food Dehydrating, “dehydrate” always means using an electric food dehydrator — the easy, reliable way to dry food at home.
Click the "Save" button (above) to pin
this page’s ideas to your Pinterest board!


LATEST READS on EFD
-
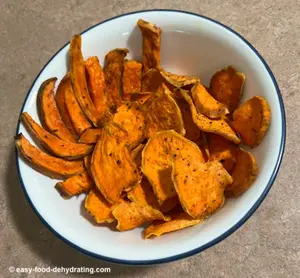
Dehydrated Sweet Potato Treats: Human and Dog Approved
May 12, 26 09:01 AM
 Make these dehydrated sweet potato treats for you AND your dog. Plus dog-safe tips for sharing the love of snacking!
 -
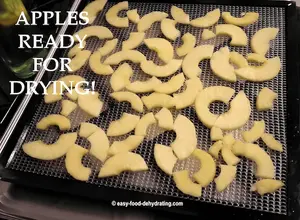
Dehydrate Apples for Snacks and Pantry Storage
May 11, 26 09:07 AM
 Dehydrate apples easily: slice, prevent browning, dry at 125–135°F, and store for snacks, pies, or pantry use.
 -
Green Split Pea Soup Made Easy in the Slow Cooker
Apr 30, 26 09:10 AM
 Easy slow cooker green split pea soup with ham, carrots, and celery—comforting, flavorful, and simple to make.

Unlock the Secrets of Food Dehydrating... from Fruit 'n' Veg to Doggie Dinners!


AFFILIATE DISCLOSURE: I am an Affiliate for Amazon, and other sellers of quality merchandise. Should you purchase an item through their links, I may receive compensation. The price you pay does not increase. THANKS for your support! Read full disclosure here.
easy FOOD DEHYDRATING: Making food preservation simple since 2010. I show you how to keep your food pantry full, whatever the reason or season!

HOME ARTICLES CONTACT DMCA DISCLAIMER FAQ PRIVACY SITEMAP TERMS TESTIMONIALS
ALL CONTENT COPYRIGHT © 2010-2025 • ALL RIGHTS RESERVED REGARDLESS OF LINKS OR ATTRIBUTIONS.
POWERED BY SBI! (SOLO BUILD IT!)
As an Amazon Associate, I earn from qualifying purchases.