What We Mean by “Dehydrate”
Here at Easy Food Dehydrating, “dehydrate” always means using an electric food dehydrator — the easy, reliable way to dry food at home.
- Home
- Food Vacuum Sealer Instructions (Part 1) for FoodSaver V2240 Model

Food Vacuum Sealers – Compare Models
& Sealing Tips (Part 1)

Food vacuum sealers are a must-have if you dehydrate, freeze, or bulk-store your food. They remove air from storage bags, keeping food fresher up to five times longer while protecting against freezer burn, pests, and humidity.
✅ Quick Answer: What does a food vacuum sealer do?
A food vacuum sealer removes air from storage bags to prevent spoilage, extend freshness, and block freezer burn. It’s ideal for dehydrated foods, leftovers, and bulk storage, keeping food safe and tasty up to 3–5 times longer.
Whether you’re sealing soups, jerky, or dried fruit, vacuum sealing makes long-term storage simple and safe.
I've been using the FoodSaver V2240 (shown below) since 2010 and sadly it's not available any more on Amazon... but keep reading to see my top picks for fancy stainless-steel models that look stellar on your kitchen counter!

This hardworking vacuum and sealing machine is an integral part of dehydrating food. Why? I need it to safely store my dried food. You see, we need to remove the air from the plastic food vacuum sealer bags. This helps preserve its contents for long-term storage.
Why Food Vacuum Sealers Are Worth Every Penny
Using a food vacuum sealer has many benefits. It helps to keep food fresh for a longer period.
- Removes oxygen to prevent spoilage - food lasts 3-5 times longer when vacuum-sealed.
- Locks in flavor, and nutrients.
- Creates an airtight seal to block moisture and pests.
- Saves space - vacuum sealing removes air which reduces overall volume when storing.
- Allows for organized, stackable storage - customized bags easily fit into storage containers such as plastic-lidded bins, and airtight buckets.
Stop Freezer Burn & Moisture Damage With This Trick
When using a FoodSaver purely for leftovers (or storing fresh food for that matter), it helps prevent freezer burn and keeps food from being damaged by humidity.
But if you're going to be storing your dehydrated food for an extended period, vacuum sealing is a great way to keep it fresh.
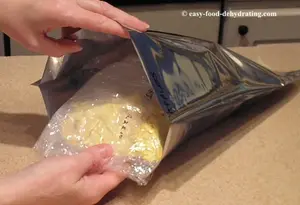
After dehydrating our fruit, vegetables (and meats!), we store them in plastic vacuum-sealer bags. We don't just seal the bags, we ALSO draw the air OUT of the bags.
Don't forget to add an oxygen absorber into the plastic vacuum-sealer bag before drawing out the air with the Food-Saver vacuum sealer.
IMPORTANT:
For proper vacuum-bag placement,
please click here for Part 2
to see lots more photos and explanations.
The photos show you exactly where to place the open-end
of the bag on the machine for perfect seals every time!
The #1 Step People Skip Before Sealing (Don’t Miss It)
After dehydrating our food, we let them condition; this is a step many people skip - but shouldn't! After conditioning, it's time to place the foods into quart-size or pint-size vacuum sealer bags.
Add the 100cc oxygen absorber along with a 5g desiccant packet and now we're ready to use the FoodSaver® machine to vacuum the air out of our bags.
To preserve foods properly for long-term storage, it is very important to keep out these three elements:
- Moisture
- Air
- Light
Beat the 3 Biggest Enemies of Long-Term Food Storage
- By dehydrating the food first, that takes care of the 'moisture' issue.
- By vacuuming the bags, we achieve the 'air' removal.
- By storing our vacuum-sealed food in Mylar bags and then in bins, preferably in a dark area like a closet, that takes care of the 'light' issue.
Compare Top FoodSaver Models & Starter Kits
The FoodSaver machines remove air, one of the main causes of mold and food spoilage - and they create an airtight seal to lock in freshness.

Bonsenkitchen Vacuum Sealer Machine
The Bonsenkitchen Vacuum Sealer is a powerful, low-noise machine built for high-speed, continuous use. It features a handle-locked design, built-in cutter, and comes with 2 bag rolls plus 100 vacuum bags — everything you need for easy, efficient food preservation.

Keep food fresh up to 5x longer with the FoodSaver 4800 2-in-1 Vacuum Sealer. Automatic sealing, built-in handheld sealer, and easy-clean drip tray make it perfect for everyday meals or bulk storage.

FoodSaver 8" x 20' rolls, 6-pk
FoodSaver GameSaver 8" x 20' Vacuum Seal Long Roll with BPA-Free Multilayer Construction
- Keep game and fish fresh up to 5x Longer with FoodSaver GameSaver 8-inch rolls.
- Create custom-sized bags - simply cut a piece to your desired length, seal one end, fill, and then vacuum seal.
- 8" x 20' rolls
- BPA-free
- Pack of six rolls

FoodSaver 1-Quart Food Storage Sealer bags
- Constructed of durable yet pliable material that creates an airtight barrier around foods, extending freshness and locking in flavors
-
Quickly and easily portion food
from bulk shopping or when storing leftovers.
- BPA-FREE MATERIAL: Safe for storing raw and cooked foods, it's also freezer, refrigerator, microwave, and boil-safe
- 1-quart size precut bags, 44-count

FoodSaver Pint-size Food Storage Sealer bags
- Constructed of durable yet pliable material that creates an airtight barrier around foods, extending freshness and locking in flavors
-
Quickly and easily portion food
from bulk shopping or when storing leftovers.
- BPA-FREE MATERIAL: Safe for storing raw and cooked foods, it's also freezer, refrigerator, microwave, and boil-safe
- 1-pint size precut bags, 28-count
As an Amazon Associate, I earn commission from qualifying purchases. The price you pay does not increase. Read disclosure here.
Why I Still Trust This Compact Sealer After Years of Use

I've been using my FoodSaver® for many years now, and it's never let me down.
If you need to store it for a while, use a plastic
garbage can liner and twist-tie to keep it clean and dust-free.
Cleaning Secret: The One Spot Everyone Forgets
After using (and before storing) your food vacuum sealer, make sure to clean out the narrow oval-ended tray that sits down below the lower oval vacuum-chamber opening.
I know we are mainly vacuum sealing "dry" ingredients, so most of the "stuff" you'll find in that tray are tiny pieces of dehydrated items that you can just toss out, then wipe the tray out with a clean damp dish cloth.
Of course, if it's really dirty, wash it in warm soapy water, let it air dry, and replace it in the machine.
I DO NOT clamp my handle down when it's in storage—there's no need to do that. I don't see any point in "squooshing" the roller against the strip when not in use - or while in storage.
Bag Placement Secrets for a Perfect Seal (See Part 2)
IMPORTANT:
For proper vacuum-bag placement,
please click here for Part 2
to see lots more photos and explanations.
The photos show you exactly where to place the open-end
of the bag on the machine for perfect seals every time!
Freeze Liquids Before Vacuum Sealing for a Perfect Seal

If you try to vacuum seal soups, stews, or sauces while they’re still liquid, the machine can suck juices into the chamber — and trust me, they’re a pain to clean out (if you can even find where they went!).
Yes, most models have a drip tray, but when you’re using accessories like the Pawcute jar sealer, where do those juices end up once they get sucked up the tube? Nobody knows! That’s why freezing your liquids first is such a smart idea. Once solid, they vacuum seal beautifully, giving you a tighter seal, easier cleanup, and longer storage life.
Food Vacuum Sealer FAQs: What Shoppers Always Ask
Do I really need a food vacuum sealer if I already dehydrate food?
Do I really need a food vacuum sealer if I already dehydrate food?
Yes. Dehydrating removes moisture, but air exposure can still cause spoilage. A vacuum sealer plus an oxygen absorber keeps food safe for years.
Can I vacuum seal soups or liquids?
Can I vacuum seal soups or liquids?
Yes, but freeze liquids first so they don’t get sucked into the machine. Once solid, vacuum seal them like any other food.
Are FoodSaver bags reusable?
Are FoodSaver bags reusable?
Some are. You can cut the sealed edge off and reuse the rest of the bag for dry foods. For wet or oily foods, it’s best to use new bags.
How long does food last when vacuum sealed?
How long does food last when vacuum sealed?
Vacuum-sealed dehydrated foods can last 5–10 years if stored with oxygen absorbers and desiccant packets in a cool, dark place. Frozen items last up to 2–3 years without freezer burn.
Vacuum sealing is one of the easiest ways to protect the food you’ve worked hard to dehydrate. From soups to jerky, it locks in freshness and saves space.
And before you go, don’t forget to grab your free 5 Dried Food Recipes You'll Actually Love PDF below—featuring carrot soup, minestrone, split pea, spicy beef jerky, and banana cinnamon rolls. They’re my personal favorites, and I think you’ll enjoy them too!
Part 2 is here!
Get 5 Dried Food Recipes You'll Actually Love

Here's where you can get your copy of our all new
5 Dried Food Recipes (That Actually Taste Great)
They're my all-time favorite easy dried food meals!
Get it here right now.
For Free!
You Might Like These
Mylar Bags for Dehydrated Food Storage: Seal for Years!
Use Mylar bags for dehydrated food storage: oxygen absorbers, sealing tips, and sizes for long-term freshness.
What Are Food Dehydrators? How They Work & Benefits
Learn what food dehydrators are, how they work, and preserve food naturally—no refrigeration or additives needed.
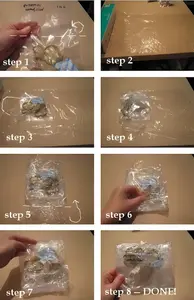
Plastic Wrap Guide: Stop Vacuum-Bag Punctures
Prevent vacuum-bag punctures: cushion sharp edges on vacuum-sealed packets. Easy steps, quick tools, reuse tips.
How to Store Dehydrated Food for Long-Term Freshness
Keep dehydrated food fresh for years: Vacuum sealing, Mylar bags, oxygen absorbers, desiccant packets plus storage tips.
Why Oxygen Absorbers for Dehydrated Food are a Must
Keep dehydrated foods fresh longer with oxygen absorbers. Get sizes, tips, and FAQs for safe long-term pantry storage.
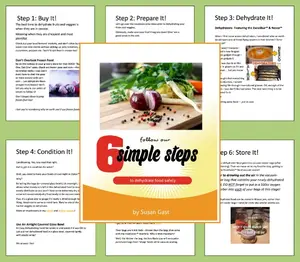
Keep Your Food Pantry Full: Why & Exactly How to Do It
Keep your pantry full with simple strategies. Get the free Six Simple Steps email mini-course to dehydrate safely.


You Might Like These
Mylar Bags for Dehydrated Food Storage: Seal for Years!
Use Mylar bags for dehydrated food storage: oxygen absorbers, sealing tips, and sizes for long-term freshness.
What Are Food Dehydrators? How They Work & Benefits
Learn what food dehydrators are, how they work, and preserve food naturally—no refrigeration or additives needed.
Plastic Wrap Guide: Stop Vacuum-Bag Punctures
Prevent vacuum-bag punctures: cushion sharp edges on vacuum-sealed packets. Easy steps, quick tools, reuse tips.
How to Store Dehydrated Food for Long-Term Freshness
Keep dehydrated food fresh for years: Vacuum sealing, Mylar bags, oxygen absorbers, desiccant packets plus storage tips.
Why Oxygen Absorbers for Dehydrated Food are a Must
Keep dehydrated foods fresh longer with oxygen absorbers. Get sizes, tips, and FAQs for safe long-term pantry storage.
Keep Your Food Pantry Full: Why & Exactly How to Do It
Keep your pantry full with simple strategies. Get the free Six Simple Steps email mini-course to dehydrate safely.
Before You Go...
If you enjoyed this page, tap the ❤️ in the lower right-hand corner.
It saves this page to your Grow bookmarks so you can find it again later.
You’ll also see quick share buttons to copy the link, post to Facebook,
or save it straight to Pinterest.
What We Mean by “Dehydrate”
Here at Easy Food Dehydrating, “dehydrate” always means using an electric food dehydrator — the easy, reliable way to dry food at home.
Click the "Save" button (above) to pin
this page’s ideas to your Pinterest board!


LATEST READS on EFD
-
Green Split Pea Soup Made Easy in the Slow Cooker
Apr 30, 26 09:10 AM
 Easy slow cooker green split pea soup with ham, carrots, and celery—comforting, flavorful, and simple to make.
 -
12 Common Mistakes When Dehydrating Food (and Fixes)
Apr 20, 26 09:37 AM
 Discover 12 common mistakes when dehydrating food—and simple fixes for even drying, better flavor, and longer storage.
 -
Dehydrated Tomato Minestrone Soup – Easy Pantry Meal
Apr 16, 26 10:32 AM
 Make dehydrated tomato minestrone soup with dried veggies, beans, and pasta—a cozy, shelf-stable meal ready anytime.


Unlock the Secrets of Food Dehydrating... from Fruit 'n' Veg to Doggie Dinners!


AFFILIATE DISCLOSURE: I am an Affiliate for Amazon, and other sellers of quality merchandise. Should you purchase an item through their links, I may receive compensation. The price you pay does not increase. THANKS for your support! Read full disclosure here.
easy FOOD DEHYDRATING: Making food preservation simple since 2010. I show you how to keep your food pantry full, whatever the reason or season!

HOME ARTICLES CONTACT DMCA DISCLAIMER FAQ PRIVACY SITEMAP TERMS TESTIMONIALS
ALL CONTENT COPYRIGHT © 2010-2025 • ALL RIGHTS RESERVED REGARDLESS OF LINKS OR ATTRIBUTIONS.
POWERED BY SBI! (SOLO BUILD IT!)
As an Amazon Associate, I earn from qualifying purchases.