What We Mean by “Dehydrate”
Here at Easy Food Dehydrating, “dehydrate” always means using an electric food dehydrator — the easy, reliable way to dry food at home.
- Home
- Dehydrate Eggs Safely
- How to Dehydrate Meat

How to Dehydrate Meat: Safety Tips & Jerky Recipe

Wondering how to dehydrate meat? Here is a safe, smart, and cost-effective way to preserve your favorite proteins - without needing a freezer or pressure canner. This guide walks you through everything: from prepping lean cuts and choosing the right temps to tasty jerky recipes and long-term storage tips.
✅ Quick Answer: How do you dehydrate meat safely?
To dehydrate meat safely, cook it first to 160°F (70°C) to kill harmful bacteria, trim all visible fat, and slice into even pieces. Dry at 160°F until leathery but pliable. For jerky, raw meat is marinated to help preserve it, then dehydrated to the same safe temperature.
Whether you're dehydrating leftovers or making snacks for your next hiking trip, this page has you covered.

Click Images for FULL Information on Beef, Chicken, Pork, Turkey, or Seafood (Tuna, Salmon, Shrimp)


Click any of the images above to visit the meat (and/or seafood) page of your choice!
How to Dehydrate Leftover Meat Safely and Easily
Dehydrating leftover meat is a simple process! This guide will walk you through safe dehydration, storage, and creative ways to use dried meat in recipes.
We've also included an easy beef jerky recipe further down the page!
What Happens During Meat Dehydration?
The Four Main Ways to Preserve Meat
- Dehydrating
- Smoking
- Freeze-drying
- Curing with salt
To make the most of family meal prep, consider cooking extra meat and dehydrating it for future use!
Why Dehydrating is the Best Option for Long-Term Storage
Dehydrating meat is one of the best long-term storage methods because it extends shelf life without needing refrigeration or freezing. By removing up to 95% of moisture, it becomes lightweight, compact, and shelf-stable for months or even years. Unlike freezing, there’s no risk of freezer burn or spoilage during power outages, making it a reliable option for stocking up and outdoor adventures.
This method also preserves nutrients and enhances flavor without relying on preservatives like curing. It’s safer and simpler than canning, and rehydrating is as easy as soaking in water or broth.
How to Prep Meat Before Dehydrating
Because we are dehydrating cooked meats, no further cooking is needed before drying. Follow these simple preparation steps:
Choosing the Best Meats for Dehydration
- Select lean cuts to prevent spoilage (fat causes rancidity).
- Trim off visible fat before dehydrating.
How to Slice Meat for Even Drying
- BEEF: Slice evenly to ensure consistent dehydration. Read ALL about Dehydrating Beef here.
- CHICKEN: Cut into uniform strips. Read ALL about Dehydrating Chicken here.
- TURKEY: Same method applies. Learn about Dehydrating Turkey here.
- PORK: Trimmed, lean slices work best. All about Dehydrating Pork here.
- SEAFOOD: Dehydrate fish carefully. Visit our guide on Dehydrating Seafood here.
How to Dehydrate Ground Beef (Cooked First!)
The Importance of Cooking Ground Beef Before Dehydration
Ground beef must be cooked before dehydration:
- Brown the meat in a pan, breaking it into small, uniform crumbles.
- Drain excess fat and pat dry with a paper towel.
- Spread evenly on dehydrator trays.
What’s the Best Temperature for Dehydrating Cooked Meat?
Set your dehydrator to 160°F (70°C) and dry meat until it is leathery but still pliable.
- If meat isn’t dried long enough, bacteria can grow.
- Over-drying can make meat too tough to chew.
💡 Tip: Outside the U.S.? Most dehydrating temps here are listed in Fahrenheit - use our quick converter to see the Celsius equivalent for your machine.
Equipment: Dehydrator vs. Oven (Which Should You Use?)
Both an electric food dehydrator (our recommended tool) and a regular oven can dry meat successfully. Here’s a quick guide to help you choose.
Electric Food Dehydrator (Recommended)
- Precision & Airflow: Built-in fans and vents move air evenly for consistent drying.
- Temperature Control: Most models hold a steady 160–165°F (70–74°C) for safe meat dehydration.
- Capacity: Multiple trays mean more meat per batch.
- Hands-Off: Fewer rack rotations and less monitoring needed.
Want help choosing? See our guide “What Are Food Dehydrators” for model tips and buying advice.
Regular Oven (Works in a Pinch)
- Accessibility: No special gear required.
- Setup Tips: Set to the lowest setting (aim near 160°F / 70°C); use a wire rack on a sheet pan so air circulates under slices.
- Vent & Rotate: Prop the door slightly ajar (if safe for your model) and rotate trays more often for even drying.
- Energy & Monitoring: Uses more energy and needs closer watching than a dehydrator.
Quick Comparison: Dehydrator vs. Oven
| Feature | Dehydrator | Oven |
|---|---|---|
| Airflow | Fan-driven, even | Static; needs door ajar & rotations |
| Temperature Control | Holds 160–165°F reliably | Lowest setting; may fluctuate |
| Batch Size | Multi-tray, scalable | Limited by rack space |
| Hands-On Time | Low | Moderate–High |
Why You Should Dehydrate Cooked Meats Only
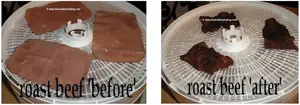
For faster, safer dehydration, use pre-cooked sliced meats like roast beef, chicken, or turkey. Simply slice and dehydrate for quick results!
What Types of Meat Dehydrate Best?

Some meats dehydrate better than others. The best options include:
✔ Lean beef cuts (sirloin, flank, London broil)
✔ Skinless chicken
✔ Lean turkey
✔ Salmon
✔ Venison (Be aware of recent health advisories)
How to Boost Flavor When Rehydrating Meat
Use stock to enhance flavor! When rehydrating meat, use broths or stocks instead of plain water. Try Better Than Bouillon for added taste.
How to Make Delicious Homemade Beef Jerky

How to Make Beef Jerky Using a Dehydrator
Ingredients:
- 1 lb beef (sirloin, flank, or London broil)
- 2 tablespoons soy sauce
- 2 teaspoons Worcestershire sauce
- 1 teaspoon onion powder
- 1 teaspoon garlic powder
- 1/2 teaspoon black pepper
- 1/4 teaspoon cayenne pepper (optional)
- 1/4 cup brown sugar (optional)
Instructions:
- Slice beef into ¼-inch thick strips (trim fat).
- Marinate in a resealable bag for at least 4 hours.
- Set dehydrator to 165°F and dry for 6-8 hours.
- Store in airtight containers.
How to Make Beef Jerky in the Oven
Instructions:
- Preheat oven to 200°F.
- Place beef on a wire rack that fits inside a baking sheet.
- Bake for 4-6 hours until slightly chewy.
- Store in an airtight container in the refrigerator.
💡 Pro Tip: Use a food vacuum sealer for long-term storage!
💡 Tip: Outside the U.S.? Most dehydrating temps here are listed in Fahrenheit - use our quick converter to see the Celsius equivalent for your machine.
Jerky Marinade Recipes: Sweet, Spicy, and Savory
Classic Smoky Teriyaki Marinade
A perfect balance of sweet and savory with a hint of smokiness.
- ¼ cup soy sauce
- 2 tbsp Worcestershire sauce
- 1 tbsp honey or brown sugar
- 1 tsp liquid smoke
- ½ tsp garlic powder
- ½ tsp onion powder
- ¼ tsp black pepper
Spicy Chipotle Lime Marinade
For a bold, zesty kick with a smoky heat.
- ¼ cup lime juice
- 2 tbsp olive oil
- 1 tbsp adobo sauce (from canned chipotle peppers)
- 1 tsp smoked paprika
- ½ tsp cumin
- ½ tsp garlic powder
- ¼ tsp cayenne pepper
Sweet & Savory Maple Bourbon Marinade
A rich, slightly sweet marinade with a deep, savory flavor.
- ¼ cup maple syrup
- 2 tbsp bourbon (or apple cider vinegar as a substitute)
- 1 tbsp soy sauce
- 1 tsp Dijon mustard
- ½ tsp black pepper
- ½ tsp smoked paprika
Check out this guide to the eight best cuts of beef, brought to you by The Best Stop.
Top Tips for Dehydrating Meat Like a Pro
💡 Paul Bee’s Tip: Get lean roast beef sliced 1/16" thick from the deli!
💡 Sarah’s Tip (Australia): Use low-fat canned chicken—it rehydrates perfectly!
Recipe Idea: Use Your Dried Meat in Beef Stew

Use your dehydrated meat to make a delicious beef stew!
FAQ: Meat Dehydration Tips & Troubleshooting
Can you dehydrate meat without cooking it first?
Can you dehydrate meat without cooking it first?
No. For general meat dehydration (like for storage or stew meat), meat should always be fully cooked before dehydrating to destroy harmful bacteria.
However, jerky is the exception: when making jerky, the meat is typically dehydrated raw after marinating. The marinade acts as a curing and preservative aid, helping inhibit bacteria while the dehydrator brings the meat to a safe internal temperature - typically 160°F (70°C) or higher.
What’s the best temperature to dehydrate meat?
What’s the best temperature to dehydrate meat?
160°F (70°C) is ideal. This temperature ensures pathogens are killed and that the meat dries to a safe, shelf-stable level of moisture.
How long does dehydrated meat last?
How long does dehydrated meat last?
When properly dried and stored in airtight containers (preferably vacuum-sealed), dehydrated meat can last 6 months to 1 year. Keep it cool, dark, and dry.
Why is fat trimmed before dehydrating?
Why is fat trimmed before dehydrating?
Fat doesn’t dehydrate well and can go rancid during storage. Always trim visible fat from meat to extend shelf life and improve flavor.
Can I use canned meat for dehydration?
Can I use canned meat for dehydration?
Yes! Low-fat canned chicken, turkey, or beef can be drained, patted dry, and dehydrated for fast results with less prep.
Thanks for learning how to dehydrate meat safely! Ready to turn those dried meats into real meals? Whether it’s soups, stews, or jerky snacks, having dehydrated meat on hand makes cooking faster and storage simpler.
Don’t leave without grabbing your free 5 Dried Food Recipes You'll Actually Love PDF (below)—they’re quick, filling, and full of flavor.
Get 5 Dried Food Recipes You'll Actually Love

Here's where you can get your copy of our all new
5 Dried Food Recipes (That Actually Taste Great)
They're my all-time favorite easy dried food meals!
Get it here right now.
For Free!
You Might Like These
How to Dehydrate Beef (Sliced, Safe & So Simple!)
Dehydrate beef using pre-cooked roast slices—perfect for snacks, storage, or jerky. Step-by-step guide + recipe!
How to Dehydrate Turkey (Safely & Easily)
Dehydrate turkey the easy way! Use pre-sliced or evenly cut pieces for safe, consistent drying results.
How to Dehydrate Chicken the Safe & Simple Way
Learn how to dehydrate pre-cooked chicken for safe, tasty meals that last—perfect for prep, travel, or shelf storage.
Dehydrate Seafood at Home: Safe Salmon, Shrimp & Tuna
How to dehydrate seafood safely—salmon, shrimp, and tuna. Step-by-step prep, drying temps, and storage tips included.
How to Dehydrate Cooked Pork (Safely & Deliciously!)
How to Dehydrate Cooked Pork (Safely & Deliciously!) Dehydrate leftovers for soups and stews!
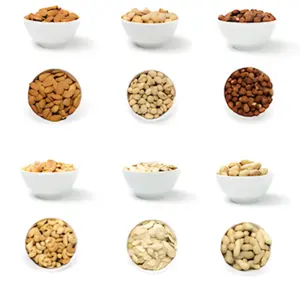
Dehydrate Nuts and Seeds for Long-Lasting Freshness
Dehydrate Nuts and Seeds: Learn how to soak, dehydrate, and store nuts and seeds. Keep them crisp for months!


You Might Like These
How to Dehydrate Beef (Sliced, Safe & So Simple!)
Dehydrate beef using pre-cooked roast slices—perfect for snacks, storage, or jerky. Step-by-step guide + recipe!
How to Dehydrate Turkey (Safely & Easily)
Dehydrate turkey the easy way! Use pre-sliced or evenly cut pieces for safe, consistent drying results.
How to Dehydrate Chicken the Safe & Simple Way
Learn how to dehydrate pre-cooked chicken for safe, tasty meals that last—perfect for prep, travel, or shelf storage.
Dehydrate Seafood at Home: Safe Salmon, Shrimp & Tuna
How to dehydrate seafood safely—salmon, shrimp, and tuna. Step-by-step prep, drying temps, and storage tips included.
How to Dehydrate Cooked Pork (Safely & Deliciously!)
How to Dehydrate Cooked Pork (Safely & Deliciously!) Dehydrate leftovers for soups and stews!
Dehydrate Nuts and Seeds for Long-Lasting Freshness
Dehydrate Nuts and Seeds: Learn how to soak, dehydrate, and store nuts and seeds. Keep them crisp for months!
Before You Go...
If you enjoyed this page, tap the ❤️ in the lower right-hand corner.
It saves this page to your Grow bookmarks so you can find it again later.
You’ll also see quick share buttons to copy the link, post to Facebook,
or save it straight to Pinterest.
What We Mean by “Dehydrate”
Here at Easy Food Dehydrating, “dehydrate” always means using an electric food dehydrator — the easy, reliable way to dry food at home.
Click the "Save" button (above) to pin
this page’s ideas to your Pinterest board!


📌 Pin It for Later

LATEST READS on EFD
-
Dehydrated Sweet Potato Treats: Human and Dog Approved
May 12, 26 09:01 AM
 Make these dehydrated sweet potato treats for you AND your dog. Plus dog-safe tips for sharing the love of snacking!
 -
Dehydrate Apples for Snacks and Pantry Storage
May 11, 26 09:07 AM
 Dehydrate apples easily: slice, prevent browning, dry at 125–135°F, and store for snacks, pies, or pantry use.
 -
Green Split Pea Soup Made Easy in the Slow Cooker
Apr 30, 26 09:10 AM
 Easy slow cooker green split pea soup with ham, carrots, and celery—comforting, flavorful, and simple to make.


Unlock the Secrets of Food Dehydrating... from Fruit 'n' Veg to Doggie Dinners!


AFFILIATE DISCLOSURE: I am an Affiliate for Amazon, and other sellers of quality merchandise. Should you purchase an item through their links, I may receive compensation. The price you pay does not increase. THANKS for your support! Read full disclosure here.
easy FOOD DEHYDRATING: Making food preservation simple since 2010. I show you how to keep your food pantry full, whatever the reason or season!

HOME ARTICLES CONTACT DMCA DISCLAIMER FAQ PRIVACY SITEMAP TERMS TESTIMONIALS
ALL CONTENT COPYRIGHT © 2010-2025 • ALL RIGHTS RESERVED REGARDLESS OF LINKS OR ATTRIBUTIONS.
POWERED BY SBI! (SOLO BUILD IT!)
As an Amazon Associate, I earn from qualifying purchases.