What We Mean by “Dehydrate”
Here at Easy Food Dehydrating, “dehydrate” always means using an electric food dehydrator — the easy, reliable way to dry food at home.
- Home
- Fruit dehydration Basics and Equipment - Pt 1
- Fruit Dehydration Process and Storage - Pt 2

Fruit Dehydration Process and Storage - Part 2

Welcome to Part 2 - Fruit Dehydration: Process and Storage.
Read Part 1 HERE.
The secret to perfect dried fruit starts before your dehydrator ever hums to life - it begins with choosing the right produce and following a step-by-step process that locks in flavor and ensures long shelf life. From picking peak-ripeness fruit to conditioning and storing it properly, every stage matters.
✅ Quick Answer: What is the fruit dehydration process and how do you store dried fruit?
The fruit dehydration process involves washing, slicing, and drying fruit at the right temperature until leathery but moisture-free. Once dried, condition in jars for a week, then store in airtight containers, vacuum-sealed bags, or Mylar with oxygen absorbers to keep fruit safe and tasty for months.
Dehydrating fruit isn’t just about saving money or preventing waste - it’s about creating healthy, delicious pantry staples you’ll actually enjoy eating months down the line.

The journey to perfect dried fruit starts long before you plug in the dehydrator — it begins at the market, the orchard, or even your own backyard.
The fruit you pick today is the foundation for everything that comes next.
Just like you wouldn't build a house on shaky ground, you can’t make great dried fruit out of bruised, overripe, or flavorless produce.
Good fruit in = great dried fruit out.
That said, there's one time when "less than perfect" fruit can still shine:
If you’re making fruit leathers, slightly bruised or misshapen fruits are just fine — because you’ll be blending them into a smooth purée anyway!
Nothing wasted, and still delicious.
How to Choose the Best Fruit for Drying (and Avoid Wasting Time)
Every fruit has its “just right” moment for drying — firm enough to slice without squishing, but ripe enough to lock in the best flavor and natural sweetness.
When you know what to look for (and what to avoid), you're already halfway to creating homemade dried fruits that beat anything you’ll find in a store.
Whether it’s juicy summer peaches, crisp autumn apples, or tropical mangoes from the market — picking the best fruit is where it all begins.
Fruit Ripeness Guidelines
| Fruit Type | Temperature | Drying Time | Preparation Method | Pre-treatment | Signs of Doneness |
|---|---|---|---|---|---|
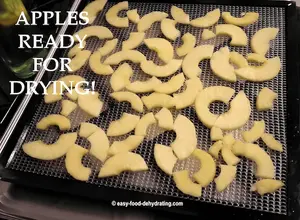
| Apples | 135–140°F | 6–12 hrs | ⅛–¼" slices, core removed | Lemon juice dip (optional) | Leathery, pliable, no moisture |
| Bananas | 135°F | 8–16 hrs | ¼" slices | Lemon juice dip | Leathery, pliable |
| Berries (Strawberries) | 135°F | 8–14 hrs | Halved or ¼" slices | None needed | Leathery, no moisture |
| Blueberries | 135°F | 12–18 hrs | Whole, check skin | None needed | Leathery, rattle when shaken |
| Cherries | 135°F | 12–18 hrs | Halved, pitted | None needed | Leathery, slightly tacky |
| Citrus | 135°F | 8–12 hrs | ¼" slices, remove seeds | None needed | Pliable, no moisture |
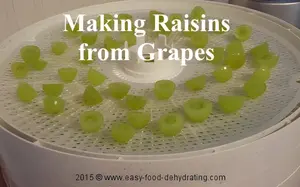
| Grapes | 135°F | 12–24 hrs | Whole or halved | None needed | Pliable, raisin-like |
| Mangoes | 145°F | 12–16 hrs | ¼" slices | Optional lemon dip | Leathery, pliable |
| Peaches | 140°F | 8–16 hrs | ¼" slices | Lemon juice dip | Leathery, pliable |
| Pears | 140°F | 8–16 hrs | ¼" slices | Lemon juice dip | Leathery, pliable |
| Pineapple | 145°F | 12–18 hrs | ¼" rings or spears | None needed | Leathery, pliable |
| Plums | 140°F | 8–16 hrs | Halved or quartered | None needed | Leathery, pliable |
Apples
Bananas
Berries (Strawberries)
Blueberries
Cherries
Citrus
Grapes
Mangoes
Peaches
Pears
Pineapple
Plums
Quick Ripeness Tips to Remember:
- Under-ripe: Less sweet, harder to dry evenly
- Perfectly Ripe: Ideal sugar content, best flavor
- Over-ripe: Higher moisture, harder to preserve
Seasonal Cheat Sheet for Fruit Picking
- Spring: Strawberries, apricots, early cherries
- Summer: Peaches, plums, berries, cherries, figs
- Fall: Apples, pears, grapes
- Winter: Citrus fruits, imported tropical fruits (like mangoes and papayas)
Quality Check: Signs of Good Fruit
Before you load up your basket (or backyard bucket), make sure your fruit passes the test:
- Firm flesh, no bruising
- Bright, vibrant color
- No signs of mold or decay
- Even ripeness across the batch
- Fresh, fruity aroma you can actually smell
Fruit Prep 101: Slice, Core, and Prep Like a Pro
Before you start drying, knowing how to prep each type of fruit makes a huge difference in the final flavor, texture, and storage life.
Here’s a quick cheat sheet to get you slicing like a pro:
Stone Fruits
Peaches: Remove pits, slice about 1/4 inch thick
Plums: Halve or quarter, remove pits
Cherries: Pit and halve
Apricots: Halve and remove pits
Pome Fruits (Apples & Pears)
Apples: Core, peel if you want, slice about 1/8 inch thick
Pears: Core, peel optional, slice about 1/4 inch thick
Berries
Strawberries: Slice 1/4 inch thick
Blueberries: Pierce the skin with a knife or halve them
Raspberries: Leave whole
Blackberries: Halve if they're really large
Tropical Fruits
Mangoes: Peel and slice 1/4 inch thick
Pineapple: Peel, core, and slice 1/4 inch thick
Papaya: Peel, scoop out seeds, slice evenly
Kiwi: Peel and slice 1/4 inch thick
Prep Secrets: Simple Tricks That Make Fruit Dry Better
Cleaning: Don't Skip This Step!
A little prep goes a long way when it comes to dehydrating fruit the right way.
Here’s what you’ll want to do before your fruit hits the dehydrator trays:
1. Give it a Good Rinse
- Remove dirt, debris, and any field dust
- Use cool running water
- Handle gently to avoid bruising
2. Optional: Sanitizing Bath
- Use a food-grade produce wash or
- A Vinegar solution (1 part vinegar to 3 parts water)
- Always rinse thoroughly after sanitizing
Cutting: Keep It Consistent!
1. Basic Cutting Tips
- Aim for uniform thickness to dry evenly
- Use sharp knives to avoid crushing the fruit
- Always work on a clean cutting board
2. Helpful Shortcuts
- Use a mandoline slicer for super consistent slices
- Cross-cut large fruits into even pieces
- Adjust thickness depending on the fruit type (thicker fruits like pears = slightly thicker slices)
Pre-Treating Your Fruit (Optional but Recommended)
Pre-treatments help prevent browning, keep colors vibrant, and sometimes even boost flavor. Here’s a quick look at your options:
1. Ascorbic Acid Solution (Vitamin C Boost)
- Mix 1 tablespoon of ascorbic acid per quart of water
- Soak fruit slices for about 5 minutes
2. Lemon Juice Solution (Natural Option)
- Mix 1 part lemon juice to 1 part water
- Soak slices for about 10 minutes
3. Honey Dip (For Sweet Lovers)
- Mix 1 part honey to 4 parts warm water
- Soak for just a few minutes
- Adds a little extra sweetness and acts as a natural preservative
4. Steam Blanching (For Firmer Fruits)
- Steam fruit for 1–2 minutes
- Immediately transfer to an ice bath to stop the cooking
- Helps preserve texture and prevent enzymatic browning
The Dehydration Process Explained: How to Get Consistent Results Every Time
Dehydrating fruit isn’t just pushing a button and walking away — it’s part science, part art.
Finding that perfect balance between temperature, time, and your environment is what turns good dried fruit into great dried fruit.
Success doesn’t just depend on having the right gear — it’s about knowing how your local climate plays into the drying process.
Whether you’re working in humid Florida or bone-dry Arizona, tweaking your approach based on your environment makes all the difference.
Environmental Considerations: How Climate Affects Drying
Drying Fruit in Humid Climates
If you’re battling high humidity, here’s what to do:
- Expect drying times to stretch out by 25–35%
- Run a dehumidifier if your drying room is over 60% humidity
- Use an air conditioner to pull extra moisture from the air
- Add desiccant packets when storing dried fruit to avoid spoilage
- Check your trays more often for early signs of fermentation (sour smells = bad news!)
Drying Fruit in Dry Climates
Dry climates are usually a dehydrator’s best friend — but they come with their own quirks:
- Drying times may speed up by 15–25%
- Watch for case hardening (where the outside dries too fast but the inside stays moist)
- Solar drying could be a great low-cost option if you’ve got hot sun
- Regular airtight storage methods should be enough — no major extra moisture controls needed
- Check trays carefully during the first few hours (that’s when rapid drying can trip you up)
Dehydrating at High Altitudes
Live 3,000 feet or more above sea level? You’ll want to adjust a few things:
- Lower your dehydrator temperature by about 5°F for every 1,000 feet above sea level
- Drying times may be a little faster (thanks to lower air pressure)
- Keep an eye on your moisture levels — fruit can sometimes feel dry outside but still be sticky inside
- Always consider humidity and altitude together for best results
Drying Temperature Guide: Stop Guessing and Start Perfecting
💡 Tip: Outside the U.S.? Most dehydrating temps here are listed in Fahrenheit - use our quick converter to see the Celsius equivalent for your machine.
Different fruits do best at slightly different temps. Here's a simple guide:
Low-Temperature Fruits (135°F)
- Berries
- Grapes
- Cherries
- Citrus
Medium-Temperature Fruits (140°F)
- Apples
- Pears
- Peaches
- Plums
High-Temperature Fruits (145°F)
- Pineapple
- Mango
- Papaya
How Long Does It Take?
Quick-Drying Fruits (6-12 hours)
- Whole berries
- Banana slices
- Pineapple rings
Medium-Drying Fruits (12-18 hours)
- Fruits sliced and laid in a single layer
- Pieces not touching each other
- Good airflow between slices
- Rotate trays as needed for even drying
Long-Drying Fruits (18-24 hours)
- Check trays every 2–4 hours
- Feel the texture to catch that “just right” leathery stage
- Remove fully dried pieces as they’re ready
- Keep rotating trays if needed to even out stubborn spots
Done or Not Done? Easy Ways to Test Fruit for Perfect Dryness
Your work isn't done the minute the dehydrator starts humming!
Drying fruit takes attention and a little bit of intuition.
It's a lot like learning to cook without a recipe — after a few batches, you'll start to "just know" when things are ready.
Here's how to spot it:
Quick Doneness Tests
- Berries: Should rattle when you shake the container
- Apples/Pears: Tear in half — no moisture should show
- Stone Fruits: Leathery and bendy, no sticky spots
- Citrus: No moisture when you squeeze it gently
Signs Your Fruit Isn't Ready
- Cool or damp spots in the center when squeezed
- Sticky or tacky surfaces
- Visible moisture when cut or torn
- Pieces that feel unusually heavy or dense
If you notice any of these? Back into the dehydrator they go!
Storing Dried Fruit the Right Way: Keep It Fresh, Safe, and Tasty
Good drying is half the battle — smart storage is the other half!
And it starts right when the fruit comes out of the dehydrator, not days later.
The Conditioning Process: Don't Skip It!
Conditioning lets any leftover moisture even out between pieces — it’s a crucial step for preventing future mold.
Here's how:
- Cool fruit completely (1–2 hours)
- Fill a clear, airtight jar about two-thirds full
- Shake the jar once a day for 7 days
- Watch for any beads of moisture (if you see any, re-dry!)
- If all looks good after a week - you’re good to stash it away
Shelf Life Secrets: How Long Your Dried Fruit Will Actually Last
Choose the right storage method based on how long you want your dried goodies to last:
Short Term (1-2 Months)
- Airtight containers at room temp
- Mason jars with tight-fitting lids
- Zip-top bags (remove as much air as possible)
Medium Term (2–6 Months)
- Vacuum-sealed bags
- Glass Mason jars with oxygen absorbers
- Mylar bags with desiccant packets
Long Term (6+ Months)
- Vacuum-sealed and then frozen
- Mylar bags with oxygen absorbers
- Pro tip: Double-bagging in Mylar + vacuum seal = serious shelf life!
Beyond Snacking: Creative (and Tasty!) Uses for Dried Fruit
Dried fruit isn’t just a snack — it's a secret weapon in your kitchen. Here’s how to get creative:
Breakfast Boost
- Oatmeal topping
- Yogurt mix-in
- Pancake stuffing
Baking Star
- Cookie add-ins
- Bread boosters
- Muffin mixers
Dinner Delights
- Salad toppers
- Rice pilaf sweeteners
- Sauce enrichers
Pro-Level Hacks to Boost the Flavor, Texture, and Fun of Dried Fruit
Ready to kick it up a notch? Try these advanced techniques:
Fruit Leather Making
- Control thickness
- Create fun patterns
- Perfect your roll-up technique
Flavor Infusion
- Add spices
- Mix in extracts
- Glaze lightly with honey
Texture Manipulation
- Control crispy vs chewy outcomes
- Create fruit powders
- Layer for different effects
Troubleshooting Guide: Quick Fixes for Common Fruit Drying Problems
Even pros hit bumps sometimes. Here’s how to troubleshoot:
Common Problems & Smart Solutions
Issue: Brittle Fruit
Cause: Over-dried
Fix: Lower temp or reduce drying time next batch
Issue: Moldy After Storage
Cause: Insufficient drying or poor storage
Fix: Discard, redo conditioning step next time
Issue: Uneven Drying
Cause: Slices not uniform
Fix: Rotate trays, recut pieces if needed
Issue: Color Loss
Cause: Too much light/heat exposure
Fix: Lower temp, pre-treat, store in dark area
Humid or Dry? How Climate Affects the Fruit Dehydration Process
Drying conditions shift with the seasons — stay ahead of the curve:
Extended Drying Time
Cause: High humidity
Fix: Use dehumidifier or AC in drying room
Case Hardening
Cause: Too rapid drying in dry climate
Fix: Lower temp slightly, increase humidity a little
Inconsistent Batches
Cause: Changing seasonal humidity
Fix: Keep records and tweak times as needed
Smart Answers to Common Fruit Dehydration and Storage Questions
How do I know when fruit is properly dehydrated?
How do I know when fruit is properly dehydrated?
Cut the fruit in half and check the center—there should be no visible moisture. It should feel leathery or slightly crisp depending on the fruit type, but never sticky.
Can I store dehydrated fruit without special equipment?
Can I store dehydrated fruit without special equipment?
Yes! For short-term storage, use airtight Mason jars or containers. For longer storage, use food vacuum sealer bags with oxygen absorbers and desiccant packets. For extended storage, use Mylar bags with oxygen absorbers to extend shelf life significantly.
Why does my dried fruit sometimes mold?
Why does my dried fruit sometimes mold?
This usually happens when fruit isn’t fully dried or conditioned. Always complete the conditioning process (shaking in jars for a week) to even out hidden moisture before long-term storage.
Can I mix different fruits in the same jar?
Can I mix different fruits in the same jar?
Only if each type has been dried and conditioned separately. Mixing fruit with different moisture levels can cause spoilage.
How long does dehydrated fruit really last?
How long does dehydrated fruit really last?
Stored in airtight jars, dried fruit lasts 1–2 months. With vacuum sealing or Mylar bags and oxygen absorbers, you can extend shelf life to 6 months or more, even up to a year if frozen.
Dehydrating fruit is more than a food-storage method—it’s a way to enjoy healthy, homemade snacks while stretching your harvest further. With a little practice, you’ll master the entire process from selection to storage, and your pantry will thank you.
And if you’d like to take it one step further, grab your free 5 Dried Food Recipes You’ll Actually Love PDF (below). Inside you’ll find my favorite recipes—carrot soup, minestrone soup, split pea soup, spicy beef jerky, and banana cinnamon rolls—so you can start using your dried food in delicious ways right away.
Grab 5 Dried Food Recipes You'll Actually Love

Here's where you can get your copy of our all new
5 Dried Food Recipes (That Actually Taste Great)
They're my all-time favorite easy dried food meals!
Get it here right now.
For Free!
You Might Like These
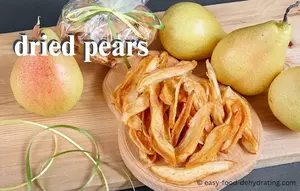
How to Dehydrate Pears: Easy Steps & Long Shelf Life
Dehydrate pears the easy way for snacks, smoothies, and baking. Save money and enjoy sweet pear flavor all year long!
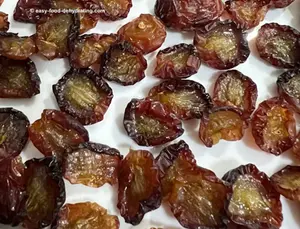
How to Dehydrate Grapes for Nature’s Candy Anytime
Dehydrate grapes to make chewy, sweet bites of nature’s candy AKA raisins! Perfect for snacking or adding to recipes!
How to Dehydrate Apricots: Quick, Easy, Step-by-Step
Learn how to dehydrate apricots: syrup blanch (3–4 min), drying temps and times, storage tips, and doneness checks.
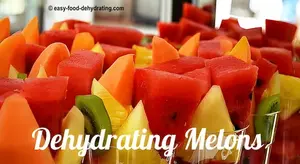
How to Dehydrate Melons for Sweet Snacks & Storage
Learn how to dehydrate melons, including watermelon and honeydew, for sweet snacks and long-term storage!
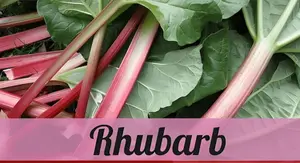
How to Dehydrate Rhubarb: Easy Method + Sauce & Jam
Learn how to dehydrate rhubarb at 125–135°F in 6–14 hours, plus easy rhubarb sauce and jam recipes for year-round use.
How Much Fruit Fills a Dehydrator: Tray Guide & Tips
Find out how much fruit fills a dehydrator with our easy tray guide for Nesco, Excalibur, and Elite Gourmet machines.

You Might Like These
How to Dehydrate Pears: Easy Steps & Long Shelf Life
Dehydrate pears the easy way for snacks, smoothies, and baking. Save money and enjoy sweet pear flavor all year long!
How to Dehydrate Grapes for Nature’s Candy Anytime
Dehydrate grapes to make chewy, sweet bites of nature’s candy AKA raisins! Perfect for snacking or adding to recipes!
How to Dehydrate Apricots: Quick, Easy, Step-by-Step
Learn how to dehydrate apricots: syrup blanch (3–4 min), drying temps and times, storage tips, and doneness checks.
How to Dehydrate Melons for Sweet Snacks & Storage
Learn how to dehydrate melons, including watermelon and honeydew, for sweet snacks and long-term storage!
How to Dehydrate Rhubarb: Easy Method + Sauce & Jam
Learn how to dehydrate rhubarb at 125–135°F in 6–14 hours, plus easy rhubarb sauce and jam recipes for year-round use.
How Much Fruit Fills a Dehydrator: Tray Guide & Tips
Find out how much fruit fills a dehydrator with our easy tray guide for Nesco, Excalibur, and Elite Gourmet machines.
Before You Go...
If you enjoyed this page, tap the ❤️ in the lower right-hand corner.
It saves this page to your Grow bookmarks so you can find it again later.
You’ll also see quick share buttons to copy the link, post to Facebook,
or save it straight to Pinterest.
What We Mean by “Dehydrate”
Here at Easy Food Dehydrating, “dehydrate” always means using an electric food dehydrator — the easy, reliable way to dry food at home.
Click the "Save" button (above) to pin
this page’s ideas to your Pinterest board!


LATEST READS on EFD
-
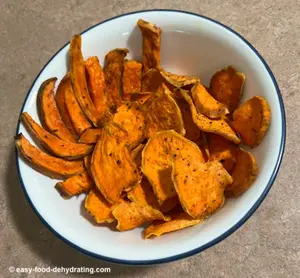
Dehydrated Sweet Potato Treats: Human and Dog Approved
May 12, 26 09:01 AM
 Make these dehydrated sweet potato treats for you AND your dog. Plus dog-safe tips for sharing the love of snacking!
 -
Dehydrate Apples for Snacks and Pantry Storage
May 11, 26 09:07 AM
 Dehydrate apples easily: slice, prevent browning, dry at 125–135°F, and store for snacks, pies, or pantry use.
 -
Green Split Pea Soup Made Easy in the Slow Cooker
Apr 30, 26 09:10 AM
 Easy slow cooker green split pea soup with ham, carrots, and celery—comforting, flavorful, and simple to make.

Unlock the Secrets of Food Dehydrating... from Fruit 'n' Veg to Doggie Dinners!


AFFILIATE DISCLOSURE: I am an Affiliate for Amazon, and other sellers of quality merchandise. Should you purchase an item through their links, I may receive compensation. The price you pay does not increase. THANKS for your support! Read full disclosure here.
easy FOOD DEHYDRATING: Making food preservation simple since 2010. I show you how to keep your food pantry full, whatever the reason or season!

HOME ARTICLES CONTACT DMCA DISCLAIMER FAQ PRIVACY SITEMAP TERMS TESTIMONIALS
ALL CONTENT COPYRIGHT © 2010-2025 • ALL RIGHTS RESERVED REGARDLESS OF LINKS OR ATTRIBUTIONS.
POWERED BY SBI! (SOLO BUILD IT!)
As an Amazon Associate, I earn from qualifying purchases.