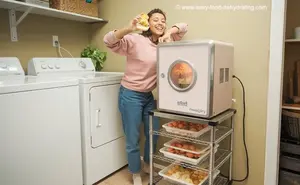
What We Mean by “Dehydrate”
Here at Easy Food Dehydrating, “dehydrate” always means using an electric food dehydrator — the easy, reliable way to dry food at home.
- Home
- Easy Dehydrated Food Recipes
- Bread and Pizza with Anita’s Easy No-Knead Dough

Bread and Pizza Made Easy
with Anita’s No-Knead Recipe

If you love homemade bread and pizza but hate complicated recipes, you’ll love Anita’s no-knead dough. With just pantry staples and a little patience, this single recipe makes a chewy pizza crust and a fluffy loaf of bread—without any kneading. It’s truly beginner-friendly and budget-wise.
✅ Quick Answer: Can one dough recipe make both bread and pizza?
Yes. Anita’s no-knead dough uses pantry staples, requires no kneading, and makes both chewy pizza crust and crusty bread. Mix the dough, let it rise for two hours, then shape into either a loaf or a pizza base before baking.
I’ve tested it myself and share not only the successes but also the lessons learned, so you can skip the flubs and get straight to delicious results.

🍞🍕 The One Dough Recipe That Makes Both Bread and Pizza
Anita kindly shared her bread recipe right here!
What Happened When I Tried Anita’s Bread-and-Pizza Dough
Anita did ask me later how the pizza making went, and I told her to have a look at the page you're reading now. She kindly pointed out that I had not followed her directions properly—see below!
You see, I was having problems getting the pizza pie off the spatula!
Why Pizza Dough Sticks (and the Surprising Trick That Solves It)
The trick to getting the pizza off the spatula is this: Anita uses non-stick parchment paper!!! I DO WISH I'd read that earlier.
She cuts paper to fit the baking stone, puts the raw dough on it, and lets it rest for 20 minutes.
THEN Anita bakes the EMPTY crust shell for about 2 to 3 minutes... and then removes the parchment paper from underneath the crust. This means the dough isn't raw and won't stick to the spatula. To be on the safe side, I dusted the spatula with some ground-up oatmeal.
Bear in mind my spatula is metal; I'm pretty sure you wouldn't have the same sticking issue if you used a wooden pizza paddle.
Remember to add the water at this point in the oven!
I need to add this here: be careful what container you use to hold the water...
I shattered my Pyrex glass dish due to NOT having water in it and letting it heat up empty (sigh) so now I've got a tin-foil (aluminum foil!) pie crust pan in there for the water!
I think that the Pyrex glass dish WOULD HAVE BEEN OK if I'd remembered to add the water to it first, before turning on the oven.
The Perfect Topping Order for Pizza Success
Now it's time to add the toppings after the crust has finished baking. I can't wait to report back to let you know how the spatula remedy worked this time!
My hubby just walked by and said "That was your baseline pizza, Susan!" :-)
Also, Anita says to add the sauce first, then the cheeses, then the toppings! I'll get it right next time! Look here! I did it right this time: Anita's Pizza Take-Two!
Here's the dough. See the pictures below, just after mixing - and then two hours later.

What to Expect: Dough After Two Hours of Rising
Not only are Anita and James excellent cooks, but they also modify campers. Check out Anita's hubby James' newfound passion: quirky camper modifications!

The photo above shows the rolled-out dough for the pizza crust, then the spatula dusted with ground-up oatmeal, and then the crust with the edges rolled up a tad to keep the sauce from spilling out!

Almost ready for the oven! Just need to add three cheeses.
I added about 4 oz. of grated medium Cheddar, maybe 2 oz. of grated Parmesan, and about 3 oz. of Mozzarella. This is what I had on hand in the refrigerator.
I put lots of homemade sauce, with some rehydrated peppers, and mushrooms on the pastry BEFORE I added the cheese. Of course, you can use fresh peppers and mushrooms too! :-)
Into the oven it went... with a bit of a battle, but eventually, I won. But it wasn't a pretty sight. And the photo on the right (above) is what it looked like 20 minutes later! Remember, THIS was BEFORE I learned the trick of pre-baking the crust, and lightly flouring the metal spatula.
My husband ate all that for his lunch—he deserved it, though. He'd been out mowing the grass for hours on end.
I ate the scrunched/messed up part from forcing it OFF the darned spatula... I'm not brave enough to show that mess here! :-)
20 Taste-Tested Easy Recipes

How to Make
EASY MEALS
containing dehydrated food...
that even your kids
and spouse will eat!

🍕 Pizza! 🥧 Shepherd's Pie! 🥘 Beef Stew! plus
Cauliflower Soup and Cauliflower Mash, along with crazy Carrot Soup!
Decadent Desserts: Carrot Cake and Cranberry Pineapple Pie!
and more...
Fresh food ingredient amounts are included for when you have fresh food on hand.
See which recipes are included here.
Why This No-Knead Bread Works—Even If You’re a First-Timer

Here's Anita's bread recipe. I wrote and asked her if I should have kneaded the bread at all. Her answer: "No"—so how easy is that? She said to just "mix it well, and then let it sit for two hours."
Now, even I can do that!
Here is the bread after its two-hour wait, then lightly floured on top so I could score it. It's now ready for the oven! I decided to "bake" the stone for a short while so it could get really warmed up.
Please note: I only used HALF of the ingredient amounts from Anita's recipe, as it was my first time making it. Half of the ingredient amounts made this one loaf AND the pizza! Yummy.


Bread & Pizza Dough FAQs You’ll Actually Use
Can I really use the same dough for both bread and pizza?
Can I really use the same dough for both bread and pizza?
Yes! This no-knead dough bakes into a chewy pizza crust or a crusty loaf. Just shape it differently after the rise.
How do I stop pizza dough from sticking?
How do I stop pizza dough from sticking?
Pre-bake the crust on parchment paper for 2–3 minutes, then remove the paper. Dust paddles with flour or oatmeal for extra insurance.
Do I need a special pan or stone?
Do I need a special pan or stone?
No. A baking sheet works fine, but a preheated pizza stone gives the crispiest crust.
Can I freeze leftover dough?
Can I freeze leftover dough?
Yes. Freeze it in an airtight bag. Thaw and let it rise before shaping and baking.
Do I really not have to knead the dough?
Do I really not have to knead the dough?
That’s the beauty of it—no kneading needed! Just mix, rest, and bake.
Thanks for joining me on this bread-and-pizza adventure! Whether you’re after a quick homemade pizza night or a crusty loaf for dinner, Anita’s dough is proof that baking doesn’t have to be complicated.
Want to keep easy meals coming? Grab my free 5 Dried Food Recipes You'll Actually Love PDF below—featuring reader favorites like carrot soup, minestrone, split pea soup, spicy beef jerky, and banana cinnamon rolls!
Get 5 Dried Food Recipes You'll Actually Love

Here's where you can get your copy of our all new
5 Dried Food Recipes (That Actually Taste Great)
They're my all-time favorite easy dried food meals!
Get it here right now.
For Free!
You Might Like These
Delicious Carrot Cake – Moist Cake with Dried Carrots
Free recipe for a moist, flavorful carrot cake made with dehydrated carrots – straight from Debby’s kitchen!
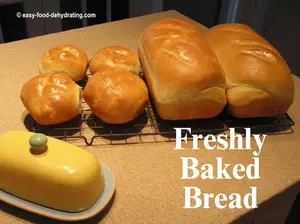
Bake Your Own Bread at Home: Easy, Foolproof Recipe
Bake your own bread at home with a simple, foolproof recipe—no machine needed. Soft, golden loaves for about $1 a loaf.
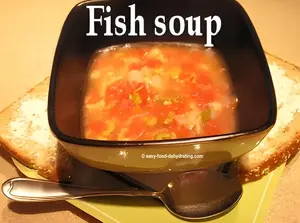
Tasty Tuna Fish Soup with Dehydrated Veggies
Make tasty tuna fish soup with dehydrated veggies—fast, hearty, and perfect for lunch or dinner.
Carrot Soup with a Tangy Twist: Bright, Creamy & Easy
Make silky carrot soup in 30 minutes. A splash of orange juice adds bright, tangy flavor—fresh or dehydrated carrots.
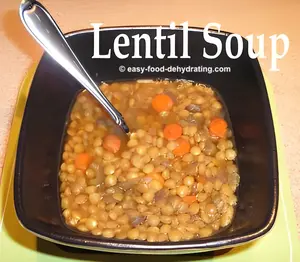
Lentil Soup with Dehydrated Vegetables - Easy Recipe
Hearty lentil soup with dehydrated vegetables—easy to cook, protein-packed, and perfect for quick meal prep.
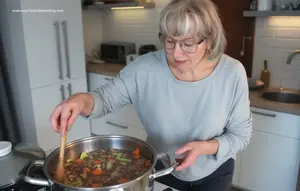
Beef Stew Made Easy with Dehydrated Vegetables
Beef Stew Made Easy: Use your slow cooker and dehydrated veggies for a hearty meal ready when you get home!


You Might Like These
Delicious Carrot Cake – Moist Cake with Dried Carrots
Free recipe for a moist, flavorful carrot cake made with dehydrated carrots – straight from Debby’s kitchen!
Bake Your Own Bread at Home: Easy, Foolproof Recipe
Bake your own bread at home with a simple, foolproof recipe—no machine needed. Soft, golden loaves for about $1 a loaf.
Tasty Tuna Fish Soup with Dehydrated Veggies
Make tasty tuna fish soup with dehydrated veggies—fast, hearty, and perfect for lunch or dinner.
Carrot Soup with a Tangy Twist: Bright, Creamy & Easy
Make silky carrot soup in 30 minutes. A splash of orange juice adds bright, tangy flavor—fresh or dehydrated carrots.
Lentil Soup with Dehydrated Vegetables - Easy Recipe
Hearty lentil soup with dehydrated vegetables—easy to cook, protein-packed, and perfect for quick meal prep.
Beef Stew Made Easy with Dehydrated Vegetables
Beef Stew Made Easy: Use your slow cooker and dehydrated veggies for a hearty meal ready when you get home!
Before You Go...
If you enjoyed this page, tap the ❤️ in the lower right-hand corner.
It saves this page to your Grow bookmarks so you can find it again later.
You’ll also see quick share buttons to copy the link, post to Facebook,
or save it straight to Pinterest.
What We Mean by “Dehydrate”
Here at Easy Food Dehydrating, “dehydrate” always means using an electric food dehydrator — the easy, reliable way to dry food at home.
Click the "Save" button (above) to pin
this page’s ideas to your Pinterest board!


LATEST READS on EFD
-
5 Dried Food Recipes You'll Love: Free PDF Guide Today
Dec 09, 25 02:06 PM
 Grab 5 dried-food recipes you can dehydrate at home—flavorful, shelf-stable, and easy. Sign up to get the free PDF.
 -
Home Freeze-Dryer Costs 2025: Is $2,500 Worth It?
Dec 02, 25 09:50 AM
 Compare home freeze-dryer costs ($1.5K–$4K) and see how one owner broke even in under 2 years!
 -
Dehydrating Fruits: Step-by-Step Guides by Type
Nov 29, 25 10:28 AM
 Learn fruit dehydration basics and find guides for apples, bananas, strawberries, and more.


Unlock the Secrets of Food Dehydrating... from Fruit 'n' Veg to Doggie Dinners!


AFFILIATE DISCLOSURE: I am an Affiliate for Amazon, and other sellers of quality merchandise. Should you purchase an item through their links, I may receive compensation. The price you pay does not increase. THANKS for your support! Read full disclosure here.
easy FOOD DEHYDRATING: Making food preservation simple since 2010. I show you how to keep your food pantry full, whatever the reason or season!

HOME ARTICLES CONTACT DMCA DISCLAIMER FAQ PRIVACY SITEMAP TERMS TESTIMONIALS
ALL CONTENT COPYRIGHT © 2010-2025 • ALL RIGHTS RESERVED REGARDLESS OF LINKS OR ATTRIBUTIONS.
POWERED BY SBI! (SOLO BUILD IT!)
As an Amazon Associate, I earn from qualifying purchases.