What We Mean by “Dehydrate”
Here at Easy Food Dehydrating, “dehydrate” always means using an electric food dehydrator — the easy, reliable way to dry food at home.
- Home
- Dehydrating Vegetables: Step-by-Step Guides by Type
- How to Dehydrate (Green) Beans

Dry Green Beans at Home:
Store Them for Easy, Tasty Meals!

Types of Green Beans: Fresh, Frozen, or Canned
Ever wondered if dehydrating green beans is worth it? The answer is a big yes! This guide shows you how to dry them at home—whether you’re working with fresh beans from the garden, frozen ones from the store, or even a few canned extras from your pantry.
👉 Just to be clear, we’re talking specifically about green beans here—not kidney beans, pinto beans, or other varieties that are usually bought already dried.
✅ Quick Answer: How do you dehydrate green beans?
To dehydrate green beans, wash, trim, and blanch the beans (or use frozen or canned ones), then dry them at 125°F–135°F for 6–8 hours in a food dehydrator. Once crisp, seal them in airtight containers with oxygen absorbers and desiccant packs for long-term use in soups, snacks, or emergency meals.
Green beans are a pantry favorite—you’ll find them in soups, casseroles, healthy snacks, and even emergency food kits. They’re nutritious, easy to dry, and simple to keep on hand for whenever you need them.

Why Green Beans Are Great for Dehydrating

Whether you’re working with fresh, frozen, or canned green beans, each type works well in a dehydrator—and they all come with their own perks:
- Fresh beans need a quick blanch but hold their shape well.
- Frozen beans are already blanched, so they’re ready to go.
- Canned beans are fully cooked and the easiest to prep—just drain and dry.
Once dried, green beans become a handy pantry staple. They’re perfect tossed into soups, stews, and casseroles, and they cut down on cooking time in a big way. I personally love using frozen green beans straight from the bag—quick, simple, and consistent results every time.
Green Bean Nutrition Info
Dehydrated green beans are packed with essential vitamins and minerals:
Vitamins:
- High in: Vitamin A, Choline, Vitamin C
- Good amounts of: Folate, Vitamin K
Minerals:
- Major minerals: Potassium, Calcium, Phosphorus, Fluoride, Magnesium
- Trace minerals: Iron, Selenium, Zinc, Manganese, Copper
Healthy Fats:
- Contains Omega-3 and Omega-6 fatty acids
💡 Tip: Add dehydrated green beans to vegetable soup or mix them into a hearty chicken & vegetable soup for an extra nutritional boost!
How to Dehydrate Fresh Green Beans
Start by giving your fresh green beans a good rinse and trimming off the ends. Then blanch them in boiling water for 3–5 minutes. This helps preserve their color, cracks the skins, and prevents case-hardening—where the outside dries too fast and traps moisture inside.
Next, spread the beans out in a single layer on your dehydrator trays. Avoid overlapping. Set your dehydrator to 125°F to 135°F and dry for 6–8 hours, rotating trays occasionally for even results.
You’ll know they’re ready when they feel tough and brittle.
💡 Tip: Outside the U.S.? Most dehydrating temps here are listed in Fahrenheit - use our quick converter to see the Celsius equivalent for your machine.
Dehydrating Frozen Green Beans

Frozen green beans are pre-blanched, so they’re ready to dehydrate straight from the bag. If the beans are clumped together, drop the unopened bag on the counter a few times or let it sit in the sink for an hour to loosen them up.
Spread the beans in a single layer on your dehydrator trays, avoiding overlap. Set the temperature between 125°F and 135°F and dry for 6–8 hours, rotating trays now and then for even drying. They’ll be done when they feel dry and brittle.

Canned green beans are even easier—just drain and rinse them first. Then place them directly on your trays (no non-stick sheet needed) and dehydrate using the same time and temperature range as above.
Best Ways to Dry Green Beans
You can dry green beans in a food dehydrator or a regular oven. Both work—but one gives you more control.
Food Dehydrator (Best Option)
Set the temp to 125°F–135°F and dry for 6–8 hours. Rotate trays halfway through for even drying. This method gives the most consistent results and is ideal for long-term storage.
Oven Drying (Back-up Option)
Preheat your oven to its lowest setting (around 125°F if possible). Spread beans in a single layer on a baking sheet and dry for 12–24 hours, depending on the size and moisture level. Turn the beans and rotate pans periodically.
💡 Tip: Keep the oven door slightly propped open with a wooden spoon to let moisture escape.
Dried vs. Canned Beans: What to Expect

When it comes to rehydrating, canned beans win for speed—they’re already cooked and soften quickly. But dehydrating your own beans gives you more control over texture and storage.
Home-dried beans might not rehydrate as fast, and some may crack or split during drying. That’s totally normal. They still pack in the flavor, nutrients, and protein, making them a smart addition to backpacking meals, soups, and long-term food storage.
Just be sure to start with clean, dry green beans before dehydrating, whether you're using fresh, frozen, or canned. A quick rinse and spread on clean trays is all it takes to get started.
How to Store Dehydrated Green Beans


Once your green beans are fully dry and brittle, let them cool before storing. For short-term use (a week or two), sealed containers or zip-top bags in your pantry work fine.
For longer storage, transfer the cooled beans to airtight containers like mason jars or vacuum-sealer bags. I recommend vacuum-sealing with a FoodSaver machine, adding a 100cc oxygen absorber and a 5g desiccant packet for best results.
Want to go full long-term? Place sealed bags inside Mylar pouches, bins, or food-grade buckets for protection from light and pests. They’ll keep for months—or even years—when stored in a cool, dry place.
How to Rehydrate Dried Green Beans
Rehydrate your dehydrated beans with clean cold water. Granted, beans can remain a little tough, even after dehydrating them.
Soak the beans in clean cold water for at least four hours, or overnight.
Bonus: Crispy Green Bean Snack Recipe (Oil-Free!)

Want a crunchy, healthy snack from your green bean stash? These crispy green bean chips are low-carb, oil-free, and seriously satisfying.
Ingredients:
- 2 cups fresh or frozen green beans
- Sea salt to taste
- Optional: garlic powder, onion powder, smoked paprika
Instructions:
- If using fresh beans, blanch for 3–5 minutes. If frozen, skip this step.
- Pat dry and toss lightly with seasonings.
- Arrange in a single layer on dehydrator trays (use mesh or solid liners to catch any seasoning).
- Dry at 125°F–135°F for 6–8 hours, until crisp and crunchy.
- Cool and store in an airtight jar. Snack away!
💡 Tip: These are great in lunchboxes, road trip bags, or just for guilt-free grazing while watching TV!
💡 Tip: Outside the U.S.? Most dehydrating temps here are listed in Fahrenheit — use our quick converter to see the Celsius equivalent for your machine.
Dehydrated Beans for Backpacking and Snacks

Dehydrated green beans are lightweight, nutritious, and perfect for trail meals.
To make snackable green bean crisps, follow the fresh bean prep steps, and the super easy recipe above!
FAQs: Dehydrating and Storing Beans
How long will dehydrated green beans last?
How long will dehydrated green beans last?
When vacuum-sealed with an oxygen absorber and stored in a cool, dark place, they can last up to 1–2 years or more.
What’s the best way to dry green bean pods for seeds?
What’s the best way to dry green bean pods for seeds?
Leave pods to dry on the vine until fully mature and brown. Harvest, then dry for 1–2 weeks in a well-ventilated area. Extract the seeds and allow them to dry another 2–3 weeks before storing.
Can I dehydrate home-canned beans?
Can I dehydrate home-canned beans?
Yes, but note that home-canned beans often shatter during drying, especially if they’re packed firm. They're still usable in soups or casseroles.
Why did my dehydrated beans crack or shatter?
Why did my dehydrated beans crack or shatter?
This can result from overly long drying or beans with thick skins. While they may look broken, they're still perfectly usable—especially in cooked dishes.
Are dehydrated beans too hard to eat as a snack?
Are dehydrated beans too hard to eat as a snack?
They can be very crunchy—sometimes too much so! If you have dental concerns, consider rehydrating before eating, or toss them into recipes where they’ll soften during cooking.
If you're ready to turn your dried beans into full meals, you're going to love our 5 Dried Food Recipes You'll Actually Love PDF. Inside you'll find my all-time favorite recipes featuring carrot soup, minestrone soup, split pea soup, spicy beef jerky, and even banana cinnamon rolls!
Grab your free copy just below and start creating delicious meals with your dehydrated stash.
Get 5 Dried Food Recipes You'll Actually Love

Here's where you can get your copy of our all new
5 Dried Food Recipes (That Actually Taste Great)
They're my all-time favorite easy dried food meals!
Get it here right now.
For Free!
You Might Like These
Dehydrating Vegetables: Step-by-Step Guides by Type
Learn vegetable dehydration basics and find guides for beets, carrots, kale, mushrooms, and more.
How to Dehydrate Carrots for Easy, Long-Term Storage
Learn how to dehydrate carrots for long-term storage—plus slicing, color, drying temps, and storage tips.
How to Dehydrate Celery: Easy Method for Crisp Results
Dehydrate celery the easy way for crisp, long-lasting flavor. Save money, reduce waste, and stock pantry-ready veggies.
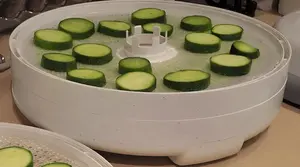
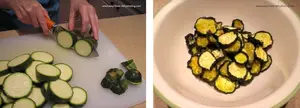
How to Dehydrate Zucchini: Slices, Shreds & Chips
How to dehydrate zucchini—slice, shred, or spiralize. Dry at 125–135°F for 5–11 hours. Storage, rehydrating, chips.
How to Dehydrate Butternut Squash for Long-Term Storage
Learn how to dehydrate butternut squash the easy way—fresh or frozen—for storage, soup, or even dog food!
How to Dehydrate Spinach: Make Flakes, Powder Easily
How to dehydrate spinach for homemade spinach powder - perfect for soups, smoothies, and long-term storage.


You Might Like These
Dehydrating Vegetables: Step-by-Step Guides by Type
Learn vegetable dehydration basics and find guides for beets, carrots, kale, mushrooms, and more.
How to Dehydrate Carrots for Easy, Long-Term Storage
Learn how to dehydrate carrots for long-term storage—plus slicing, color, drying temps, and storage tips.
How to Dehydrate Celery: Easy Method for Crisp Results
Dehydrate celery the easy way for crisp, long-lasting flavor. Save money, reduce waste, and stock pantry-ready veggies.
How to Dehydrate Zucchini: Slices, Shreds & Chips
How to dehydrate zucchini—slice, shred, or spiralize. Dry at 125–135°F for 5–11 hours. Storage, rehydrating, chips.
How to Dehydrate Butternut Squash for Long-Term Storage
Learn how to dehydrate butternut squash the easy way—fresh or frozen—for storage, soup, or even dog food!
How to Dehydrate Spinach: Make Flakes, Powder Easily
How to dehydrate spinach for homemade spinach powder - perfect for soups, smoothies, and long-term storage.
Before You Go...
If you enjoyed this page, tap the ❤️ in the lower right-hand corner.
It saves this page to your Grow bookmarks so you can find it again later.
You’ll also see quick share buttons to copy the link, post to Facebook,
or save it straight to Pinterest.
What We Mean by “Dehydrate”
Here at Easy Food Dehydrating, “dehydrate” always means using an electric food dehydrator — the easy, reliable way to dry food at home.
Click the "Save" button (above) to pin
this page’s ideas to your Pinterest board!


LATEST READS on EFD
-
Dehydrated Sweet Potato Treats: Human and Dog Approved
May 12, 26 09:01 AM
 Make these dehydrated sweet potato treats for you AND your dog. Plus dog-safe tips for sharing the love of snacking!
 -
Dehydrate Apples for Snacks and Pantry Storage
May 11, 26 09:07 AM
 Dehydrate apples easily: slice, prevent browning, dry at 125–135°F, and store for snacks, pies, or pantry use.
 -
Green Split Pea Soup Made Easy in the Slow Cooker
Apr 30, 26 09:10 AM
 Easy slow cooker green split pea soup with ham, carrots, and celery—comforting, flavorful, and simple to make.


Unlock the Secrets of Food Dehydrating... from Fruit 'n' Veg to Doggie Dinners!


AFFILIATE DISCLOSURE: I am an Affiliate for Amazon, and other sellers of quality merchandise. Should you purchase an item through their links, I may receive compensation. The price you pay does not increase. THANKS for your support! Read full disclosure here.
easy FOOD DEHYDRATING: Making food preservation simple since 2010. I show you how to keep your food pantry full, whatever the reason or season!

HOME ARTICLES CONTACT DMCA DISCLAIMER FAQ PRIVACY SITEMAP TERMS TESTIMONIALS
ALL CONTENT COPYRIGHT © 2010-2025 • ALL RIGHTS RESERVED REGARDLESS OF LINKS OR ATTRIBUTIONS.
POWERED BY SBI! (SOLO BUILD IT!)
As an Amazon Associate, I earn from qualifying purchases.