What We Mean by “Dehydrate”
Here at Easy Food Dehydrating, “dehydrate” always means using an electric food dehydrator — the easy, reliable way to dry food at home.
- Home
- Articles On How To Dehydrate Food Safely
- Food Dehydration Storage Maintenance Guide

Food Dehydration Storage Maintenance Guide:
Safety & Troubleshooting Tips

Keeping dehydrated food safe and tasty doesn’t end when the dehydrator shuts off—it’s all about storage and maintenance. The right containers, storage environment, and daily care routines will protect your food and your investment.
✅ Quick Answer: What is the best way to store dehydrated food long-term?
Store dehydrated foods in airtight containers such as Mason jars, Mylar bags, or vacuum-sealed bags. Keep them in a cool, dark, and dry location with low humidity. Always let foods cool fully before sealing to prevent condensation and mold.
This guide shows you how to store dehydrated food correctly, maintain your dehydrator, and troubleshoot common problems so every batch - whether jerky, fruit, or veggies - lasts longer and tastes better.

I attempt to cover what you need to know about storing dried foods correctly at that link AND on this page. Knowing how to maintain your equipment, involving family members in the process, and troubleshooting common problems are shared.
Whether you're dealing with jerky, dried fruits, or vegetables, here are the essential practices to make sure your dehydrated foods remain safe, flavorful, and properly preserved.
How to Keep Dehydrated Food Fresh and Safe for Months
Once your foods are dried, proper storage is what keeps them safe and tasty months later.
The Cooling-Down Countdown
The path to safe storage starts before you even reach for those containers. Here's what I've learned:
- Let foods cool completely to room temperature and check more than one piece for any remaining warmth
- Don't rush this step - warm food creates condensation in containers, which can lead to mold
Which Containers Work Best for Dehydrated Food Storage?
Not all storage containers are created equal. I've tested plenty over the years, and here's what works best:
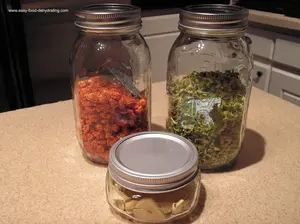
Glass Containers:
- Mason jars with tight-fitting lids are ideal
- Allow you to spot any moisture issues quickly and don't retain odors
- Work well for both short and long-term storage
Vacuum-Sealed Bags:
- Perfect for space-saving storage
- Excellent for preventing oxidation
- Great for taking on camping trips
- Remember to use heavy-duty bags for jerky to prevent punctures
Plastic Containers:
- Choose only food-grade, BPA-free options
- Best for short-term storage
- Good for foods you'll access frequently
- Not ideal for foods with strong odors
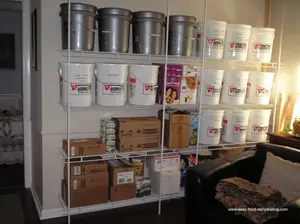
The Ideal Pantry Setup for Long-Term Dehydrated Food
Location matters almost as much as the container. Your dried foods need:
- A cool spot (ideal temperature 60-70°F)
- Dark storage area (light can degrade both nutrients and flavors)
- Low humidity (moisture is the enemy of dried foods) - good air circulation around containers
The Organization System That Works
I learned the hard way that random containers scattered throughout my pantry led to forgotten foods and wasted effort. Now I use:
- Clear labeling with contents and date
- Storage by food type (fruits with fruits, vegetables with vegetables)
- First-in, first-out rotation system
- Monthly inventory checks
I keep my pantry simple: clear labels, rotate old food first, and check monthly. This prevents wasted food. Read the full story here and see how I hid it all away!

Signs Your Storage Isn't Working
Watch for these warning signals:
- Moisture droplets inside containers
- Changes in color or texture
- Off-odors when opening containers
- Any sign of mold (when in doubt, throw it out)
Smart Habits That Make Dehydrating Easier (and Safer)
The difference between occasional success and consistent quality often comes down to your daily habits.
Here is my routine that's evolved from years of learning things the hard way.
Pre-Dehydrating Checklist: What to Do Before You Begin
Before starting any dehydrating project:
- Clean and sanitize all work surfaces
- Check that your dehydrator is thoroughly clean from previous use
- Gather all equipment before handling any food
- Ensure your hands are clean and nails scrubbed
- Have your food-grade gloves ready
After-Drying Cleaning Routine That Protects Your Food
A clean dehydrator is a happy dehydrator. After each use:
- Remove and wash trays
- Soak trays in hot, soapy water and wipe down the interior of the dehydrator with a clean, damp cloth
- Allow everything to air dry completely before next use
How to Prevent Cross-Contamination Between Batches
When switching between different foods:
- Use different cutting boards and utensils
- Clean all equipment thoroughly between foods
- Wipe down all counters and surfaces
- Change your gloves when switching food types
Weekly Deep Clean: Extend Your Dehydrator’s Life
Once a week, give your dehydrating equipment the spa treatment:
- Disassemble the dehydrator as much as safely possible
- Clean all removable parts with hot, soapy water and check corners and crevices for any buildup
Food Log Tips: Track What Works (and What Doesn’t)
I keep a simple log that includes:
- What I dried and when
- Temperature and time settings used
- Any special preparations or treatments
- Notes on the results
- Ideas for future improvements (aka, "What to do next time!")
I know it sounds a bit obsessive - but it's about learning from experience and consistently making better dried foods.
The “Sniff Test”: Spot Trouble Before It Spreads

Your nose is one of your best tools. When you walk into your kitchen:
- Notice any lingering odors from previous batches
- Check storage containers for off-smells
- Be aware of any unusual aromas around your dehydrator
- Trust your nose - if something smells off, investigate
Teaching Family Food Safety: Fun Roles for Kids & Teens
Getting the whole family involved in dehydrating makes it safer and more fun. Think of it like kitchen choreography—everyone has a part. Younger kids can check spacing between pieces, teens can spot when fruit is done, and adults handle raw meats. The key is explaining the why behind safety rules so they take it seriously.
Simple Rules Kids Will Actually Follow
I've found that the best way to involve family members is to create easy-to-remember guidelines:
- Clean hands, clean food
- When in doubt, ask an adult
- Different foods, different tools
- Label everything with its contents and date
And hey, just pretend chef Gordon Ramsey might stop by your kitchen - suddenly those safety steps won’t be skipped! (Love the new show "Secret Service"):

Building a Family Kitchen Safety Culture
Teaching food safety doesn't have to be boring:
- Post simple reminder signs at eye level
- Keep labeling tools in designated spots
- Make hand washing and cleaning up part of the routine
- Encourage questions about food safety
Family-Friendly Labeling Tricks for Food Storage
Clear labeling helps everyone stay organized:
- Contents and date clearly marked
- Expected storage life noted
- Any special storage instructions
- Who made it (creates accountability and pride)
Assigning Food Safety Tasks by Age Group
Different family members can handle different responsibilities:
- Younger kids love helping with fruit preparation
- Teens can manage temperature monitoring
- Adults handle raw meat preparation
- Everyone participates in cleaning and storage
Make the Whole Family Your Food Safety Team
Make everyone feel responsible for food safety:
- Regular checks of stored items
- Monthly inventory reviews
- Reporting any concerns about stored foods
- Celebrating successful preservation projects
Signs Your Dehydrator Needs Repair or Replacement
Signs your dehydrator needs attention:
- Uneven drying between trays
- Unusual noises from the fan
- Inconsistent heating
- Warped or damaged trays
- Loose-fitting components
When this occurs, consider replacing your dehydrator with a newer, more efficient model.
Using Smell to Detect Food Spoilage
Your nose knows when something's wrong:
- Sharp or sour odors suggest bacterial growth
- Musty smells indicate possible mold
- Chemical odors might mean cleaner residue
- Rancid smells in dried meats indicate spoilage
Final Takeaways: Smarter Storage, Safer Food
To me, it's clear that food dehydration safety isn't just about following a set of rules.
It's about understanding why those rules matter and creating habits that protect both our food and our health.
FAQs About Storing and Maintaining Dehydrated Foods
Can you use the same dehydrator for both jerky and fruits?
Can you use the same dehydrator for both jerky and fruits?
Yes. Always clean thoroughly between food types, maintain the dehydrator regularly, and use proper storage methods to prevent cross-contamination.
Can I store dehydrated food in the fridge or freezer?
Can I store dehydrated food in the fridge or freezer?
Yes, but it’s usually unnecessary. A cool, dark pantry is often best. Freezing extends shelf life but always use airtight containers to avoid freezer burn.
How long does dehydrated food last in storage?
How long does dehydrated food last in storage?
Properly stored dehydrated foods can last 6 months to 1 year or longer. Store in airtight containers in a cool, dark, and dry place.
What’s the difference between Mylar bags and vacuum-sealed bags?
What’s the difference between Mylar bags and vacuum-sealed bags?
Mylar bags block light and oxygen for long-term storage. Vacuum-sealed bags remove air but can puncture, especially with jerky. Many combine both methods with oxygen absorbers. Store vacuum-sealed bags inside Mylar bags.
Can you reuse plastic wrap when storing vacuum-sealed food?
Can you reuse plastic wrap when storing vacuum-sealed food?
Yes, if it’s clean and intact. Fold gently and reuse to protect against punctures.
Is mold on dehydrated food dangerous?
Is mold on dehydrated food dangerous?
Yes. Discard the entire batch immediately to avoid foodborne illness.
Can one bad piece spoil a whole batch?
Can one bad piece spoil a whole batch?
Yes. A moist or under-dried piece can reintroduce moisture and spoil the rest. Inspect food carefully before sealing.
How do I know if my dehydrated food has gone bad?
How do I know if my dehydrated food has gone bad?
Check for condensation, mold, off smells, or major color/texture changes. When in doubt, throw it out.
Do you need a special dehydrator for jerky vs. fruit?
Do you need a special dehydrator for jerky vs. fruit?
No. Any good dehydrator works if you clean thoroughly between food types to prevent cross-contamination.
How long should I let food cool before sealing it?
How long should I let food cool before sealing it?
Always let food cool fully to room temperature. Even slight warmth can cause condensation and spoilage.
Key Tips for Dehydrating Success
Before your next dehydrating session, remember:
- Clean equipment is safe equipment
- Temperature control matters more than you might think
- Storage is just as important as the drying process
- When in doubt about food safety, err on the side of caution
- Keep records of what works (and what doesn't)
Looking Ahead: Making Dehydration a Lasting Habit
Storing and maintaining dehydrated food doesn’t have to be complicated—once you master the right containers, environments, and cleaning routines, it becomes second nature.
If you’d like to see how delicious dehydrated food can be, grab my free 5 Dried Food Recipes You’ll Actually Love PDF below. You’ll get my favorites like carrot soup, minestrone soup, split pea soup, spicy beef jerky, and even banana cinnamon rolls!
Get 5 Dried Food Recipes You'll Actually Love

Here's where you can get your copy of our all new
5 Dried Food Recipes (That Actually Taste Great)
They're my all-time favorite easy dried food meals!
Get it here right now.
For Free!
You Might Like These
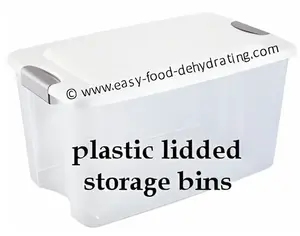
Plastic-Lidded Bins for Long-Term Food Storage Choices
Plastic-lidded bins keep dehydrated foods protected. Get airtight, sizing, and setup tips for long-term storage.
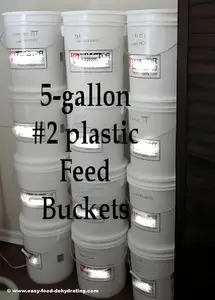
Feed Buckets With Lids: Safe Long-Term Food Storage
Food-grade feed buckets with lids keep dehydrated foods safe—airtight, pest-free, and stackable for long-term storage.
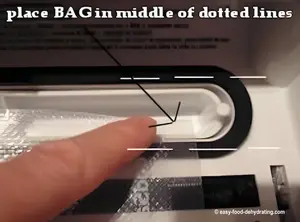
Food Vacuum Sealer Bags: Best Picks for Dehydrated Food
How to choose the best food vacuum sealer bags for dehydrated food—thickness, texture, sealing tips, and FAQs included!
Mason Jars for Dehydrated Food: Fresh, Easy Storage
Airtight, reusable Mason jars keep dehydrated foods fresh & visible—perfect for quick daily use and long-term storage.
Food Vacuum Sealer Instructions - How-To Guide Part 2
How to use a FoodSaver® vacuum sealer with step-by-step instructions, part 2. Tips for sealing Mylar bags, and more.
Dehydrated Food Storage Wall: Easy DIY Pantry Hub
Build a dehydrated food storage wall with DIY tips, cost-saving ideas, and photos to inspire your pantry plan.

You Might Like These
Plastic-Lidded Bins for Long-Term Food Storage Choices
Plastic-lidded bins keep dehydrated foods protected. Get airtight, sizing, and setup tips for long-term storage.
Feed Buckets With Lids: Safe Long-Term Food Storage
Food-grade feed buckets with lids keep dehydrated foods safe—airtight, pest-free, and stackable for long-term storage.
Food Vacuum Sealer Bags: Best Picks for Dehydrated Food
How to choose the best food vacuum sealer bags for dehydrated food—thickness, texture, sealing tips, and FAQs included!
Mason Jars for Dehydrated Food: Fresh, Easy Storage
Airtight, reusable Mason jars keep dehydrated foods fresh & visible—perfect for quick daily use and long-term storage.
Food Vacuum Sealer Instructions - How-To Guide Part 2
How to use a FoodSaver® vacuum sealer with step-by-step instructions, part 2. Tips for sealing Mylar bags, and more.
Dehydrated Food Storage Wall: Easy DIY Pantry Hub
Build a dehydrated food storage wall with DIY tips, cost-saving ideas, and photos to inspire your pantry plan.
Before You Go...
If you enjoyed this page, tap the ❤️ in the lower right-hand corner.
It saves this page to your Grow bookmarks so you can find it again later.
You’ll also see quick share buttons to copy the link, post to Facebook,
or save it straight to Pinterest.
What We Mean by “Dehydrate”
Here at Easy Food Dehydrating, “dehydrate” always means using an electric food dehydrator — the easy, reliable way to dry food at home.
Click the "Save" button (above) to pin
this page’s ideas to your Pinterest board!


LATEST READS on EFD
-
Green Split Pea Soup Made Easy in the Slow Cooker
Apr 30, 26 09:10 AM
 Easy slow cooker green split pea soup with ham, carrots, and celery—comforting, flavorful, and simple to make.
 -
12 Common Mistakes When Dehydrating Food (and Fixes)
Apr 20, 26 09:37 AM
 Discover 12 common mistakes when dehydrating food—and simple fixes for even drying, better flavor, and longer storage.
 -
Dehydrated Tomato Minestrone Soup – Easy Pantry Meal
Apr 16, 26 10:32 AM
 Make dehydrated tomato minestrone soup with dried veggies, beans, and pasta—a cozy, shelf-stable meal ready anytime.


Unlock the Secrets of Food Dehydrating... from Fruit 'n' Veg to Doggie Dinners!


AFFILIATE DISCLOSURE: I am an Affiliate for Amazon, and other sellers of quality merchandise. Should you purchase an item through their links, I may receive compensation. The price you pay does not increase. THANKS for your support! Read full disclosure here.
easy FOOD DEHYDRATING: Making food preservation simple since 2010. I show you how to keep your food pantry full, whatever the reason or season!

HOME ARTICLES CONTACT DMCA DISCLAIMER FAQ PRIVACY SITEMAP TERMS TESTIMONIALS
ALL CONTENT COPYRIGHT © 2010-2025 • ALL RIGHTS RESERVED REGARDLESS OF LINKS OR ATTRIBUTIONS.
POWERED BY SBI! (SOLO BUILD IT!)
As an Amazon Associate, I earn from qualifying purchases.